Steam flowing through giant alcove adjacent to Jacob Hamblin Arch in Coyote Gulch, Glen Canyon National Recreation Area Utah

Southern Utah Photography Tips

Southern Utah Photography Tips

Steam flowing through giant alcove adjacent to Jacob Hamblin Arch in Coyote Gulch, Glen Canyon National Recreation Area Utah Southern Utah Photography Tips
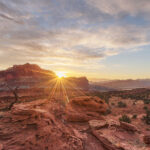
Glen Canyon National  Recreation Area #76338  Purchase

The quality of light and subject matter in Southwest Utah has been attracting photographers since the earliest days of photography. Photographers from all over the world come to photograph its deserts, canyons, hoodoos, wildflowers, and open vistas. In this follow-up to my recent post, Southern Utah Travel Tips, I hope to offer some practical advice for a safe and successful Southern Utah Photography tour. Much of the information in this post can be applied to many other areas of the Southwest as well.

Leprechaun Canyon, one of a group of canyons called the Irish Canyons near Hanksville Utah Southern Utah Photography Tips
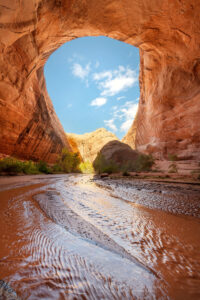
Reflected light in Leprechaun Canyon #74983  Purchase

Make Use of Reflected Light

Canyons

Reflected, or bounced light, is one of the hallmarks of Southern Utah Photography. This is the light that gives such a beautiful warm natural glow to sandstone rock. Without it, the walls of slot canyons and many other formations would appear dull and lifeless.

In most instances, a sunny cloudless sky is usually not favorable for landscape photography. But when you’re working in a canyon with high walls it’s just the thing you need. When the sun hits one side of the canyon it’s reflected on the opposite side.  Since the rock of Southern Utah is mainly sandstone with various tones ranging from cream to red it is that light that gives it a warm glow.

Twilight afterglow view from Panorama Point Capitol Reef National Park Utah Southern Utah Photography TipsPost-sunset glow over Capitol Reef National Park #75454   Purchase

Clouds

Clouds in the morning and evening also offer another opportunity to photograph this glow. Under the right conditions during the golden hour, the sun can reflect its rays off the bottom layer of clouds, giving them a warm tone. The light from the clouds then bathes the landscape below in that glow.

If you are lucky enough to be there sometimes the sun briefly breaks through heavy clouds just minutes before sunset. In these instances, it is imperative to have your composition ready and exposure calculations ready. These special instances can last only minutes before they are over.

Clearing storm at sunset over Cedar Mesa Bears Ears National Monument UtahCedar Mesa #74750  Purchase

Then there are times when the light continues to intensify on clouds even after sunset. Just when you think it’s time to pack it in it starts getting better and better. These instances are fairly rare and it takes a bit of experience to gauge when they may occur. So always wait until it’s obvious the light show is over.

Essential Tip:  When photographing in narrow canyons check out the lighting conditions throughout the day. One side may look great and offer good compositions in the morning, and the other side may look even better later in the day. Also, don’t overlook midday light, it all depends on the height of the walls and their orientation of them to the sun.

Scout Relentlessly

I can’t overemphasize the importance of scouting. Good location scouting makes the difference between coming away with great photographs and missing out on golden opportunities. There’s not much worse than being in a location during excellent lighting conditions and not knowing where the good compositions are.

Wild Horse Window, a natural arch inside a snadstone alcove. San Rafael Reef UtahSan Rafael Reef #75102  Purchase

Good location scouting begins long before you even head out. There are many sources available today to help ensure that you’re successful in the field. Some of the best and most obvious are websites of National Parks and Monuments, Google Earth, Google Image Search, adventure websites, and blogs, to name a few.

Good topographical maps are essential for not only route-finding but also for identifying landforms and angles of light. Whether you prefer actual physical maps or their digital counterparts they can help guide you to and pinpoint a location you first came across on Google Earth or elsewhere.

As soon as I settle in at a location I like to head out to explore the most obvious possible areas for compositions. I’ll walk around the subject matter and make mental notes of angles of interest and how and where light may strike it at different times of the day. After that, I’ll move on to the next subject or slowly expand in a circle from the first.

Checkerboard Mesa Zion National ParkZion National Park #76996  Purchase

After feeling I’ve covered all the possibilities available I’ll then assign priorities. Then, returning when the light is good I’ll work my way down the list. Often during the hectic period of golden hour priorities can and will shift. Sometimes a mundane or unnoticed composition from early scouting may turn out to look quite different and interesting under the right conditions.

Essential Tips:

    • Always research before you head out.
    • Thoroughly walk through your location in advance.
    • Seek out compositional elements, leading lines, foreground subject matter, unusual rock formations, plants, etc.
    • Always be observant, look up, down, low to the ground, and behind you.
    • Previsualize your subject, think of how it may look in a different light and how you want the final image to appear.
    • Prioritize subject matter and compositions.
    • Don’t make the mistake of thinking that good photos can be made only during golden or blue hours. Under the right conditions, you can make great images any time of the day!

Petrified Dunes slickrock formations, Snow Canyon State Park UtahSnow Canyon State Park #77042 Purchase

Start Early and Stay Late

Most serious photographers know that a key to success is being at the right place at the right time. The previous tips helped you to identify the right place. Now you need to be there at the right time. Get used to setting your alarm early, very early. If you’re not an early riser by nature it helps to start getting into the habit before you actually start your trip.

How early you need to rise depends on how far you are from your subject matter. A disadvantage of staying in motels or lodges is that you may have a long drive ahead of you to get to your subject in time. Part of your research and scouting should have been to identify a base camp in close proximity to your subject.

Ideally, you should arrive and be in place at least an hour before sunrise. Longer still if you plan on photographing morning blue hour. Some sunrise locations are notoriously popular with photographers. For those places arriving even earlier is essential.  For example, at Mesa Arch in Canyonlands National Park photographers will vie for a prime spot hours before it even gets light out. Some may even camp out the entire night to ensure an optimum spot.

Moki Dugway Bears Ears National MonumentCedar Mesa Afterglow #74762  Purchase

In the evening be prepared to keep working past sunset. And don’t give up if clouds moved in before sunset canceling out any good light. All you need is a last-minute break in the clouds to bring the drama back. Often in the Southwest clouds tend to dissipate around sunset. This can set up the elements for some spectacular afterglow or alpenglow lighting conditions.

Essential Tips:

    • Always have a good headlamp, preferably an LED one with multiple settings and a red light option.
    • Autofocus on your camera may not be accurate in low light. Always switch to manual focus, make test exposures and check the focus on your camera’s monitor.
    • Make sure your headlamp has fresh batteries
    • Scout your location well beforehand, so finding it in the dark will be easier.
    • Use extra caution around hazardous areas when it’s dark, straying from the path can lead to cliffs.
    • Be Patient and persistent
    • Don’t pack it in at sunset, excellent light can be had after sunset during the Blue Hour, see next segment.

Factory Butte UtahFactory Butte during Blue Hour #75293  Purchase

Utilize Blue Hour Light

Although blue-hour photography has gained in popularity in recent years it is still overlooked by some. Blue hour is simply the period of twilight both before sunrise and after sunset. The length of the blue “hour” varies throughout the year and with atmospheric conditions.

Why photograph during the blue hour? There are a few reasons, one of which is the beautiful soft glow and tones the light has. In the morning it starts with deep blues then changes to purples, pinks, reds, and oranges. In the evening of course the sequence reverses, with purples and blues being the last in the show.

Another reason the blue hour is so special is the soft contrast present due to the diffused light. It’s very easy to bring both highlights and shadows into the range of one exposure. There also is a lovely amount of color saturation spread out over the scene. In most instances, you won’t need to add any additional saturation in post-processing.

Virgin River at Court of the Patriarchs Zion National Park UtahMorning Blue Hour in Zion National Park #76937b  Purchase 

Finally, during the blue hour, the long exposures necessary will give a silky feel to moving water and clouds. Although it’s all down to personal taste this effect can accentuate the mood of your images.

Essential Tips:

    • You will definitely need to use a good sturdy tripod
    • Autofocus on your camera may not be accurate in low light. Always switch to manual focus, make test exposures and check the focus on your camera’s monitor.
    • Some means of remote shutter release will definitely help reduce vibration
    • For very long exposures use a stopwatch, or use this feature on your smartphone.
    • As mentioned in the previous section be prepared to arrive early and stay late
    • Always have a good headlamp, preferably an LED one with multiple settings and a red light option.
    • Make sure your headlamp has fresh batteries

Eroded sandstone walls and overhangs resembling Swiss Cheese in the"subway" slot portion of Crack Canyon San Rafael Reef Southern Utah Photography TipsSan Rafael Reef #75122  Purchase

Be Creative See Differently

Don’t be a copycat! Be yourself and utilize your creative instincts. You will have undoubtedly seen some great images online during your research stage. While I encourage you to be inspired by them don’t simply try and mimic their style.

There are some well-known photographers with a dramatic, moody, painterly style. Every photographer on earth seems to be clamoring to copy every pixel of their technique. Ughh! The result is a homogenous sea of look-a-like knock-offs. One thing is for sure, chasing likes on social media definitely will stifle your creativity!

Sandstone canyon wall patterns resembling an archaeopteryx fossil in Coyote Gulch, Glen Canyon National Recreation Area UtahEroded sandstone resembling Archaeopteryx fossil #76313  Purchase

Southern Utah photography has many different elements which can be used to expand your creativity. One of my favorite subjects is the abstract quality that eroded sandstone takes on. A key to creating your vision is to know your subject matter intimately. Learn to love and appreciate its moods and what makes it tick. This kind of understanding doesn’t come to fruition in one quick visit. It can take years of return visits to learn to appreciate all its subtle nuances.

I mentioned this earlier and it’s worth repeating. Don’t make the mistake of thinking good photos can be made only during golden or blue hours. Under the right conditions, you can make great images any time of the day!

Southern Utah Photography Safety

Southern Utah photography demands some extra safety and preparation considerations. My previous blog post addressed some of these concerns, but I will repeat some of them. I’ll also add a few photography-specific ones.

The tips offered below are fairly basic starting points to get you thinking. They are not all-inclusive of hazards you need to be aware of on a trip to the desert.

Halfway Hollow trailhead to Harris Wash and Zebra Slot Canyon, Grand Staircase-Escalante National Monument UtahA trailhead sign to be taken seriously #75933

Water:

Always, always carry water, everywhere you go. It’s frightening how easy it is to get quickly dehydrated in the desert. I carry a hard-sided 7-gallon water in my vehicle and top it off every chance I get. On hikes, I carry a 3-liter hydration reservoir in my pack filled with a sports drink.

Weather:

To ensure a safe and enjoyable trip carefully monitoring the weather is essential. This is especially true when hiking in any slot canyon or dry wash. Flash floods can occur from storms many miles away. Just like filling up on water and gas before you head out to a remote spot you should load up on several weather forecasts.

Sun: 

Even on a mild spring or fall day, the sun can feel burning hot. Unless you’re hiking in a deep canyon with tall walls it can be difficult to find shade. Always carry and use plenty of good sunscreen. Heat and sunstroke are serious issues that can come on very quickly in the desert. Know the warning signs and immediately get in the shade and drink plenty of fluids if you or your companions are in danger.

Quicksand:

Yes, it does exist, but in my experience, it’s not like what you see in old western tv shows and movies. You will encounter it mainly along streams in canyons, especially after heavy rain. If you’re walking on a bank along a creek that suddenly quivers like jello and liquifies under your foot that’s quicksand. It’s easy enough to extract your foot if you’re alert and don’t proceed any further. If you get both feet in it you’ll have more trouble extracting yourself and you may lose a shoe. But you won’t slowly sink to your death like in the movies.

Steam flowing through canyon walls of Coyote Gulch, Glen Canyon National Recreation Area UtahThis sandbar most likely hides quicksand #76253  Purchase

Be Alert and Use Common Sense: 

When you’re out photographing it’s very easy to be so focused on your work that you lose track of your surroundings. This is especially true during the fast-changing golden hours.

    • One easy way to get in trouble is falling into the “just one more photo” or “there’s probably a great photo just around the bend” mentality. For example, the Escalante River is a labyrinth of canyons and washes. If you’re not paying attention you can very easily get lost here, where much of the terrain looks very similar.
    • Don’t get in over your head for that one special photo. This can literally be true in some slot canyons filled with water. I’ve been wanting to photograph Zebra slot canyon for years. Last fall I finally had a chance when I was in the area. There was a pool of water at the entrance, and reportedly several more pools further on where the best photos were. I didn’t know when or if I would return for another chance so it was tempting to give it a shot. Fortunately, two hikers appeared and cautiously tested the water. Before reaching the end of the first pool the water was chest-deep. At the very least I would have risked ruining my camera gear. With a camera pack on my back, I could have drowned if it got too deep.
    • Pour-offs in canyons can be a trap. That great photo may be reached by an easy slide down a short section of slickrock at a canyon pour-off. But will you be able to get back up? If you’re on your own maybe not, and there might not be someone around to help.
    • Crumbly sandstone cliff edges are another quick way to say goodbye forever. There are many different types of sandstone in Southern Utah and some are much stronger than others. Check carefully before you lean over the edge!
    • Possibly the biggest danger is ignoring the weather to get that trophy photo. Again, you may have only this one opportunity to photograph a slot canyon. However, the weather forecast calls for severe thunderstorms miles away in the mountains. Slot canyons were created by flash floods. Think carefully if that one single photo is worth your life. It is a fact that people have lost their lives in canyons ignoring flash flood warnings.

Mesa Arch Canyonlands National Park Washer Woman Arch, Monster and Airport Towers are in the distance. Southern Utah Photography TipsMesa Arch Canyonlands National Park #74554  Purchase

Camera and Travel Gear for Southern Utah Photography

In a nutshell, my advice is to take whatever you have. Obviously, if you’re strictly a landscape photographer you’ll probably not need long telephoto lenses. My kit is pretty basic and has been quite sufficient for all my needs for many years. It consists of three lenses, a DSLR body, a tripod, and a few accessories.

Here is a partial list of some of what I personally consider essential.

    • Ultra-wide to short telephoto zoom or prime lenses. 14mm-200mm on a full-frame sensor camera is generally sufficient.
    • DSLR or Mirrorless body, and a backup body if you have one
    • Several extra batteries and charger
    • A good sturdy tripod with a ball head and quick release plate
    • Remote shutter release
    • *Polarizer filters to fit all lenses  *You’ll probably use this filter less in the Southwest than in other regions.
    • Lens cleaner and microfiber cloth
    • Memory card reader
    • Laptop or some sort of hard drive to download and store files on
    • Method to recharge camera batteries, laptop, etc. Solar panels are ideal and reduce the risk of draining your vehicle battery.
    • Dedicated camera pack for short distances
    • Backpack for all-day excursions. One that is big enough to hold all your camera gear, a 3-liter hydration reservoir, snacks, and the ten essentials. It also must be well-fitting and comfortable. Most camera backpacks currently available are way overpriced and lacking in essential features. I prefer Osprey packs, they are well designed, comfortable, durable, and reasonably affordable.
    • Hydration system. Again I use an Osprey reservoir. I’ve tried several others and this one works best for me. And no, they aren’t paying me to endorse them.
    • Hiking or trail running shoes. Heavy leather hiking boots aren’t really suitable. Consider neoprene water shoes if you’ll be crossing canyon streams often.
    • Large cotton bandana and hat

Southern Utah Photography in Conclusion

Hopefully, this along with my tips in my previous post should be enough basic information to get you excited about planning your own trip, and safely come back with some excellent images.

Thanks for reading, feel free to share this post with your friends and colleagues!

Coyote Gulch, Glen Canyon National Recreation Area Utah Southern Utah Photography TipsCoyote Gulch #76073  Purchase

Also check out: Southern Utah Travel Tips for more practical advice for your next trip!

Coming Up Next:  Backpacking and Photography in Coyote Gulch

Want to learn more, or have a professional photographer guide you in the field? Then take your Creative Photography to the next level with  Private Instruction and Guided Photo Tours.

All photos appearing in Southern Utah Photography are available for Commercial Licensing and Fine Art Prints. Click on any image to purchase, or contact me for more info!

Southern Utah Photography

Sunrise from Panorama Point, Capitol Reef National Park Utah

Southern Utah Travel Tips

Southern Utah Travel Tips

Sunrise from Panorama Point, Capitol Reef National Park UtahCapitol Reef National Park #75488  Purchase

*This post is a fairly long read

Have all my recent  Southwest Utah image additions inspired you to visit some of these locations? Are you thinking of just a leisurely vacation, or maybe a full-blown photography expedition? Well, read on, in this post I have some practical advice on how to make your trip more enjoyable and less stressful! And just as importantly how to responsibly visit these special places.

*Most of the tips in this post are for camping and adventure-oriented trips. Since I rarely stay at motels or lodges on my excursions I can’t offer reliable advice on them.

There are two things you must keep in mind when visiting Utah’s national parks and monuments.  The first is, THEY WILL BE CROWDED! Secondly, all those people are putting incredible stress on every aspect of the environment. From litter, vehicle air pollution, traffic jams, crowded trails, souvenir hunting, and even unsightly graffiti and vandalism, all our parks are under extreme pressure.

Zion Shuttle Bus at Court of the Patriarchs Zion National Park UtahZion National Park Shuttle Bus 

To meet these challenges the National Park Service, Forest Service, and many state parks now employ reservation systems, entrance quotas, and even lotteries to enter, camp, and hike in popular areas. Also, many parks are now on a shuttle bus-only system for getting around. Gone, perhaps forever, are the days when you can just arrive at a national park have your pick of a campsite, and drive your car to an uncrowded scenic vista at leisure.

Of course, there are still plenty of spectacular areas that are wide open for random camping and exploration and are also free from entry fees and reservations. Just keep in mind that many of those off-the-beaten-path destinations can be more difficult to get into, and out of. For these areas advanced research and planning are essential. Know your limitations before you head out!

Autumn sunset on The Watchman Zion National ParkZion National Park #76741  Purchase

Limit Your Southern Utah Destinations

Yes, the Golden or Grand Circle tour of national parks is a spectacular must-do trip for many. While on the road I’ve often overheard people talking about how they are doing the entire tour in five days, or less. To me that’s insane! With an itinerary like that you’re pretty much spending all your time driving from park to park every day with little time left to stop and actually enjoy the parks.

Limit your destinations to within the time you have available. Southern Utah has so much natural beauty to explore that it would be a crime to try and cram everything into one trip. Pick one or two destinations and set aside enough time to really enjoy them. You can always come back on another trip for new experiences.

Recreation.gov Love it or Hate it

There is no way around it, you will need to use Recreation.gov for reserving just about everything on your trip. It covers campsites, trail and climbing permits, lotteries, museum entrance fees, and lots more. Recreation.gov can make your trip less stressful, or incredibly stressful.

Many people including me see Recreation.gov as a monopoly akin to Ticketmaster for outdoor recreation. For one there mostly are no alternatives you can use for making reservations. Secondly, they charge service fees for all transactions which are often more than the actual fee for the activity. So planning a visit to Arches or Zion is now comparable to getting tickets for a popular concert.

Emerald green pools in The Subway, Left Fork North Creek, Zion National Park UtahA Lottery/Permit system is in place for the Subway hike in Zion #76842  Purchase

Recreation.gov is great if you plan every detail and day of your trip far in advance. With reservations in hand, you just show up at the park or campsite worry-free. But if you’re like me and you require flexibility in your itinerary then you’re in for a bit of a challenge. This is not only due to limited availability but also to accessing the Recreation.gov app. while on the road. Even with an excellent cell signal, the app can be excruciatingly slow. Of course, you can also call Recreation.gov directly but the wait can be frustratingly long to speak to an actual human. Also when you’re on the road there are often huge dead zones where you’ll be out of luck.

Essential Tip:   Always check out in advance the websites of the parks or monuments you plan to visit. Entrance fees and reservation policies are changing nearly every year. For example, in January 2020 Zion National Park implemented a lottery system for hiking the popular Angel’s Landing trail. Park websites will also prominently post any alerts to road and trail closures.

Sunrise view of Thor's Hammer and colorful hoodoos seen from below the canyon rim at Sunrise Point, Bryce Canyon National Park, UtahBryce Canyon National Park #76510 Purchase

BLM Options in Southern Utah

If your trip relies on camping and you’re out of luck in the reservation system don’t despair! The BLM (Bureau of Land Management) manages huge tracks of the desert southwest. Most BLM land offers free campgrounds and random camping. In fact, some of my favorite camping spots are on BLM land and are often my first choice. With good maps and instinct, you can often find a free campsite all to yourself in spectacular surroundings.

But just remember these spots are almost always primitive, with no water, restrooms or outhouses, picnic tables, or garbage receptacles. Always be prepared, and make sure you have plenty of water and a full tank of gas.

And don’t forget, if you can pack it in full you can pack it out empty!

Learn the Rules & Beat the Crowds in National Parks

You’ve made your reservations, arrived at the park, paid your entry fees, and set up camp. Now you are ready to have fun and explore. Great, but here are a few tips before you head out.

The first thing I do after arriving at a national park is to read the park newspaper and pay a visit to the visitors center. As I’ve mentioned many times already, all National Parks are in a constant state of change to keep up with the ever-increasing amount of visitors. You’ll need to get all the current information available regarding trail and road status, shuttle bus schedules, COVID policies, and more. It’s also a good idea to visit any interpretive exhibits to gain a better understanding of the park’s natural environment. You may also need further permits and reservations for certain trails and areas only available at the visitor center.

Sunrise at Towers of the Virgin Zion National Park UtahSunrise Zion National Park #76619  Purchase

The Early Bird and Late Bird Beats the Crowds!

To beat the crowds it’s a good idea to adopt the methods of professional photographers, get up early, really early.  You will definitely not regret this tip. The busiest times in any national park are between 10:a.m. and 5:00 p.m., give or take. Those hours are also the worst times of day to view wildlife.

If you want to enjoy that amazing scenic vista or trail and have it all to yourself then you need to be up and about before sunrise. I can’t tell you how many times I’ve been in a crowded park and enjoyed a gorgeous sunrise with hardly anyone else around. Several hours later the light will be all washed out. Plus you’ll be in a mosh pit of other gawking visitors.

This also, for the most part, goes for sunset. Most people are back in camp or town having dinner while the light warms up again for the evening show. My standard schedule is to be at my desired location at least an hour before sunrise or sunset. I’ll spend the middle part of the day scouting or relaxing before heading out again for sunset.

Essential Tip: If you’re planning on visiting several national Parks or Monuments over the course of a year then an annual America the Beautiful pass is a good investment. Most park entrance fees are in the $35 range, so you can save quite a bit on a Utah parks tour.

Best Times to Visit Southern Utah

This of course depends on the nature of your trip. I plan my trips for photographing seasonal events like fall colors or peak wildflower blooms. I need to be in specific areas within a specific time frame and have a flexible schedule. Others may simply want a leisurely sightseeing vacation. However, the parks will be very busy in whatever season you choose.

Devils Garden, Arches National Park, Utah #57917La Sal Mountains from Arches National Park #57917  Purchase

Spring in Southern Utah

This is one of the best seasons for visiting Utah’s Parks. In spring the temperatures are relatively mild and comfortable. Desert wildflowers are out and new green leaves on trees are a brilliant contrast to the red rock of the region. Also, in Arches and Canyonlands National Parks, the snow-covered La Sal Mountains provide a stunning backdrop. For these reasons, spring may also be eclipsing summer as the busiest time of year.

Spring comes early in the Southwest and I think March to mid-April is the best month to visit in the spring. February can still be pretty chilly, especially in the high altitudes of Bryce Canyon. And by the end of April, it’s already beginning to get uncomfortably hot.

Cottonwood trees in fall color Zion National Park UtahFall color Zion National Park #76599  Purchase

Fall in Southern Utah

My favorite time to visit Southern Utah is in the fall. Like spring the temperatures are mostly mild and the fall colors are spectacular. Fall is also one of the best seasons for canyoneering. The weather is much more settled, reducing the threat of flash flooding.

Fall comes late in the Southwest. Early to mid-October can still be quite warm, and color doesn’t reliably arrive until mid-to-late October. The best time to see fall colors in Zion National Park is during the first weeks of November. Of course, elevation plays a key role here. At higher elevations groves of aspens can be at their peak color in late September.

Sunset Arch, Grand Staircase-Escalante National Monument UtahGrand Staircase-Escalante National Monument  #76373  Purchase

Summer in Southern Utah

I would avoid a trip anywhere in the Southwest during summer. The heat is nearly always oppressive, and it can be deadly if your trip involves hiking or backpacking. Despite the heat, summer may be the only option for some, especially those with families. For this reason, this summer is usually the most crowded season in the Southwest.

Summer is also the monsoon season in the Southwest. Summer monsoon season is not recommended for those planning canyoneering trips. Slot canyons in particular are extremely hazardous this time of year. A calm sunny day is no guarantee of safe travel. Storms can form many miles away and dump huge quantities of rain in minutes. All that water creates deadly flash flooding in canyons, which of course is how they were formed in the first place.

Fresh dusting of snow on Red Canyon, Dixie National Forest UtahFresh snow in Red Canyon #32093  Purchase

Winter in Southern Utah 

This is rapidly becoming the new popular season among those desperate to escape the crowds. Some locations like Bryce Canyon, which sits at around 8000′, can be magical with a fresh dusting of snow on the red and orange hoodoos. Lower elevation areas can still be chilly but not uncomfortably cold.

Road conditions can be the biggest concern for a winter visitor. Main roads and highways are generally well maintained. However, it’s the unpaved gravel, dirt, and sand roads that are a problem. All of those roads turn into an inescapable quagmire after heavy rains. While the winter rains and snow are more moderate than the summer monsoons, there is not enough solar energy to dry them out enough for safe travel.

Halfway Hollow trailhead to Harris Wash and Zebra Slot Canyon, Grand Staircase-Escalante National Monument UtahTrailhead Grand Staircase-Escalante National Monument #75933  

Safely Visiting Southern Utah

Any trip to the desert Southwest can easily turn into a disaster. As the legendary polar explorer Roald Amundsen once wisely said:

“Adventure is just bad planning*”

*Unlike today back then the definition of adventure was not synonymous with fun, e.g. the Donner Party had an epic adventure.

Although you’re unlikely to fall into a glacial crevasse or die in a blizzard, there are some serious life-threatening conditions to be aware of. The tips offered below are fairly basic starting points to get you thinking. They are not all-inclusive of hazards you need to be aware of on a trip to the desert.

Water: Always, always carry water, everywhere you go. It’s frightening how easy it is to get quickly dehydrated in the desert. I carry a hard-sided 7-gallon water in my vehicle and top it off every chance I get. On hikes, I carry a 3-liter hydration reservoir in my pack filled with a sports drink.

Buckskin Gulch Paria Canyon-Vermilion Cliffs Wilderness ArizonaFlash flood debris high in slot canyon #37342 

Weather: To ensure a safe and enjoyable trip careful weather monitoring is essential. This is especially true when hiking in any slot canyon or dry wash. Flash floods can occur from storms many miles away. Just like filling up on water and gas before you head out to a remote spot you should load up on several weather forecasts.

Sun:  Even on a mild spring or fall day the sun can feel burning hot. Unless you’re hiking in a deep canyon with tall walls it can be difficult to find shade. Always carry and use plenty of good sunscreens. Heat and sunstroke are serious issues that can come on very quickly in the desert. Know the warning signs and immediately get in the shade and drink plenty of fluids if you or your companions are in danger.

Coyote Gulch BackpackerThe author after a tussle with mud and quicksand in Coyote Gulch #76355

Quicksand: Yes it does exist, but in my experience, it’s not like what you see in old western tv shows and movies. You will encounter it mainly along streams in canyons, especially after heavy rain. If you’re walking on a bank along a creek that suddenly quivers like jello and liquefies under your foot that’s quicksand. It’s easy enough to extract your foot if you’re alert and don’t proceed any further. If you get both feet in it you’ll have more trouble extracting yourself and may lose a shoe. But you won’t slowly sink to your death like in the movies.

Essential Tip:  Always know your limits, do your research, and don’t get in over your head. Online trip reports can easily mislead you, The experience level of whoever wrote the report can be very different from your own. I’ve read some trip reports promoting the Sneak Route into Coyote Gulch as an easy alternate entry point. In reality, it is close to a technical canyoneering route with a great deal of exposure, and it usually needs ropes for a safe entry and exit.

Utah State Route 95 in Glen Canyon National Recreation Area UtahUtah State Highway 95  #74968  Purchase

Cell Signals in Southern Utah:

It should be obvious, but don’t depend on being able to get a good cell phone signal in Southern Utah. There are huge dead zone areas, especially in Grand Staircase-Escalante National Monument and Glen Canyon Recreation Area. Mountains, buttes, and canyon walls can easily cut you off from a signal. Even in some small towns and national parks the signal can be spotty.

Unpaved Roads in Southern Utah

As I mentioned above unpaved roads can easily become a trap for you and your vehicle. Nearly all dirt roads are completely impassable after rain and during winter. When wet these roads become a gooey mess of mud that even a monster 4×4 would have difficulty getting out of. Even a small puddle in an otherwise dry dirt road can get you stuck.

Some roads cross deep sand which can trap all but 4x4s and some cross very rough sections of slickrock. Even some of the best-maintained gravel roads can be challenging. Hole in the Rock Road, a wide heavily traveled road south of Escalante, is routinely covered in bone-jarring washboards. After I drove over 20 miles of washboard on this road I thought my truck would fall to pieces when I stopped.

Moki Dugway Bears Ears National MonumentMoki Dugway, some roads have steep unguarded drop-offs #74769

Essential Tip:  This should be common sense but if there is a road sign that states “4×4 vehicles only” it means it! Getting a tow truck out to a remote area can cost hundreds if not thousands of dollars, assuming you can find a ride back into town to get one!

Hiking in Southern Utah with Maps and GPS

I’m not a big fan of GPS devices, I don’t use them and have always relied on physical maps on hikes. When hiking in some complex canyons such as those in the Escalante drainage it is extremely important to not completely rely on maps or GPS. While both can be important navigation aids you will be using your navigation skills and common sense to find the correct route.

Cairn on trail in The Needles, Canyonlands National Park UtahCairn marking route on trail Canyonlands National Park  #74696

Many of these areas can be a maze of side canyons obscured by thick vegetation, losing the correct route is much easier than you may think. Even the most detailed maps and GPS may not contain the info needed to make a wise choice in navigating them. The tall narrow walls of some canyons can also block out a good signal for your GPS. Also, trails in canyons marked on a map or in a guidebook can be nonexistent by the time of your visit. A well-marked easy-to-follow trail can disappear overnight in a flood.

Essential Tip:   In some areas, small rock cairns are necessary to mark the correct route. Do not remove them. And don’t add additional decorative cairns.

Essential Tip:  Before heading out to a remote area pay a visit to the nearest ranger station for the latest weather report and current info on road and trail conditions. You can also check in with the local outdoor store or guide service for a second opinion. These folks live work and play in the area and could offer valuable info not available elsewhere.
* However it’s been my experience that the young clerk at the local gas station doesn’t have a clue to offer.

Leave No Trace, Physical  Digital & Archeological

I’ve been adding this topic to the end of many of my posts. However, in light of my recent firsthand experience, I’m bumping it up and expanding it. In addition to traditional LNT, I want to talk about Digital LNT and Archeological LNT here.

If you’ve never come across this term you definitely will on your next SW trip. Its most basic definition means to take only pictures, and leave only footprints. Sounds like common sense and common courtesy to the environment and future visitors right? In the Desert Southwest, the leave only footprints part has an important twist to it.

Cryptobiotic SoilCryptobiotic Soil  #74929 

Cryptobiotic Soil:

If you haven’t heard of LNT then you probably haven’t heard of Cryptobiotic Soil. In the desert, this crusty popcorn-like soil is everywhere. It is the key to preventing the desert from being blown away into oblivion by wind and washed away by rain. The term relates to the thin crust of soil held together by fungi, lichens, cyanobacteria, and more. Undisturbed on its own it prevents the loose soil and sand beneath it from being eroded. It’s this soil that also gives plants a foothold in a tough environment.

This soil is incredibly fragile and can be destroyed by the slightest footprint. Regeneration can take decades under optimum conditions. So stay on the trail and don’t be a Crust Buster. If you absolutely must leave the trail where this soil is present then walk on durable surfaces like stones or slickrock.

To learn more about the principles and practicing LNT please take a few minutes to visit the Leave No Trace Center for Outdoor Ethics. Your children and grandchildren will thank you!

Seven Leave No Trace Principles

    • Plan ahead and prepare.                                       
    • Travel and camp on durable surfaces.                 
    • Dispose of waste properly.                                                                         
    • Leave what you find.                                            
    • Minimize campfire impacts (be careful with fire).
    • Respect wildlife.  
    • Be considerate of other visitors.

House on Fire Ruins Mule Canyon Cedar Mesa Bears Ears National Mounument UtahRuins in Bears Ears National Monument #74879  Purchase 

LNT for Archeological Sites:

The Southwest is home to many fascinating archeological sites that are both historically important and culturally sacred. It is awe-inspiring to see these sites in person, and it’s extremely important to make sure they remain intact for future generations. Learn more about them at the Bears Ears Education Center

    • Leave All Artifacts in Their Place
    • Don’t Disturb Fossils or Bones
    • Don’t Touch Rock Art or Add Your Own
    • Stay Off Walls and Structures
    • Dogs and Archeology Don’t Mix
    • Camp & eat Away From Archeology
    • Avoid Building Cairns
    • Don’t Reveal GPS Info

Giant sandstone alcove adjacent to Jacob Hamblin Arch, Glen Canyon National Recreation Area Utah #76264Glen Canyon National Recreation Area #76264 Purchase

Digital Leave No Trace

While the principles of LNT are pretty easy to understand and practice, DLNT is more difficult to implement for some. The basic idea is in response to the onslaught of crowds, resulting from everyone posting pictures on social media of locations from their latest trip. DLNT offers some guidelines to help moderate this trend, or at least make people a bit more aware of their actions.

For me, this is a tough one to deal with. I am painfully aware that I’m part of the problem. I have been wrestling with my response for quite some time. Since my livelihood is landscape and nature photography it’s just not that simple for me to stop posting pictures and writing posts like this. If I stop marketing my photography then eventually my family and I are living on the street.

So what to do? At the very least I will be vaguer when applying captions and titles to social media posts. For example, the above photo was captioned Glen Canyon National Recreation Area, which is a huge area of complex canyons. Using just this caption info you’ll probably never be able to identify the location where the photo was made. However, a determined reader would probably find a few clues as to where it is both from this post and elsewhere online.

Below are some digital leave-no-trace guidelines offered by the folks at Leave No Trace. I encourage you to click the link to learn more about the guidelines below.

    • Think Before You Geotag
    • Be Mindful of What Your Image Portrays
    • Encourage and Inspire Leave No Trace on Social Media Posts
    • Give Back to Places You Love
    • Shaming is Not the Answer

Owachomo Bridge Natural Bridges National Monument UtahNatural Bridges National Monument #74920 Purchase

Next Up: Southern Utah Photography Tips

Thanks for reading, feel free to share this post with your friends and colleagues!

Want to learn more, or have a professional photographer guide you in the field? Then take your Creative Photography to the next level with  Private Instruction and Guided Photo Tours.

All photos appearing in Southern Utah Travel Tips are available for Commercial Licensing and Fine Art Prints. Click on any image to purchase, or contact me for more info!

Southern Utah Travel Tips