 Paradise Meadows Wildflowers Mount Rainier #73268 Purchase
This post is the second of a two-part article about planning and photographing in Mount Rainier National Park Paradise Meadows. Read part one here.
A trip to photograph in Mount Rainier National Park or any other national park can be a very rewarding experience. It can also be a disappointing exercise in frustration. Good planning and having enough time available to meet your photography goals will increase your chances of success.
Since I’ve already given some tips on trip planning in my previous post, let’s start talking about locations and how best to photograph them. Mount Rainier is a big park with lots of great areas to photograph in. However, for this article, I’m going to focus only on the Paradise Meadows area and a few adjacent locations.
Essential Tip #1: All of the locations in the Paradise Meadows area provide excellent opportunities for both sunrise and sunset. In summer the sun will rise and set a bit further in the north. There will be slightly more light hitting the glaciers on Mount Rainier at sunrise than there will at sunset. Both times can provide some excellent side-lighting to wildflowers.
 Skyline Trail Mount Rainier #72892 Purchase
But First a Lecture
Mount Rainier National Park receives over 2,000,000 visitors every year, and that number will continue to grow every year. The park service has gone to great lengths and expense (your tax dollars!) to make the meadows accessible for everyone, while also trying to keep them from getting trampled into oblivion.
Please take a minute to read the park’s Meadow Preservation page.
Many trails are paved and roped off, and all have numerous signs to keep people on the trails. Please be thoughtful and considerate to the plants and future visitors, stay on the trails!
It is 100% possible to get great images while staying on the trails. But every time I photograph here I see other photographers going off the trail and trampling the flowers just to get that seemingly better photo. If everyone did that then Paradise Meadows would be nothing more than Paradise Dust Pit.
I wish I didn’t need to say this but here it goes. Do not even think of visiting Paradise Meadows unless you plan on strictly photographing only from established trails and keeping off the meadows. If you can’t do that then you should probably stay home!!
 Paradise Meadows Wildflowers #73347 Purchase
Paradise Meadows Trails and Locations
There are numerous trails in the Paradise Meadows area that give access to all the best photo locations. I like to divide the trails in the area between the west and east halves of the Paradise Meadows area. Both sections have excellent photo opportunities, but the western half has a better-unobstructed view of Mount Rainier. I also feel that the west half often has better groupings of flowers and opportunities for compositions.
Download the Paradise Meadows Hiking brochure and map here.
Essential Tip #2: Scouting is an essential technique for better photography. Always scout out the best locations in advance by spending the day hiking as many trails as possible. Make notes of the best spots and how long it will take to reach them in the morning and evening golden hours.
Essential Tip #3: Keep in mind that to reach most of the best flower meadows there is an elevation gain of several hundred feet from the parking area. While the trails aren’t steep or difficult it will take some effort to reach the best spots, especially if you’re racing against time and chasing light.
Essential Tip #4: Photo compositions in the west and east sections of Paradise are sufficiently far enough apart as to exclude photographing in both areas during the same morning or evening golden hour. Stick to one area and come back the next morning or evening for the other.
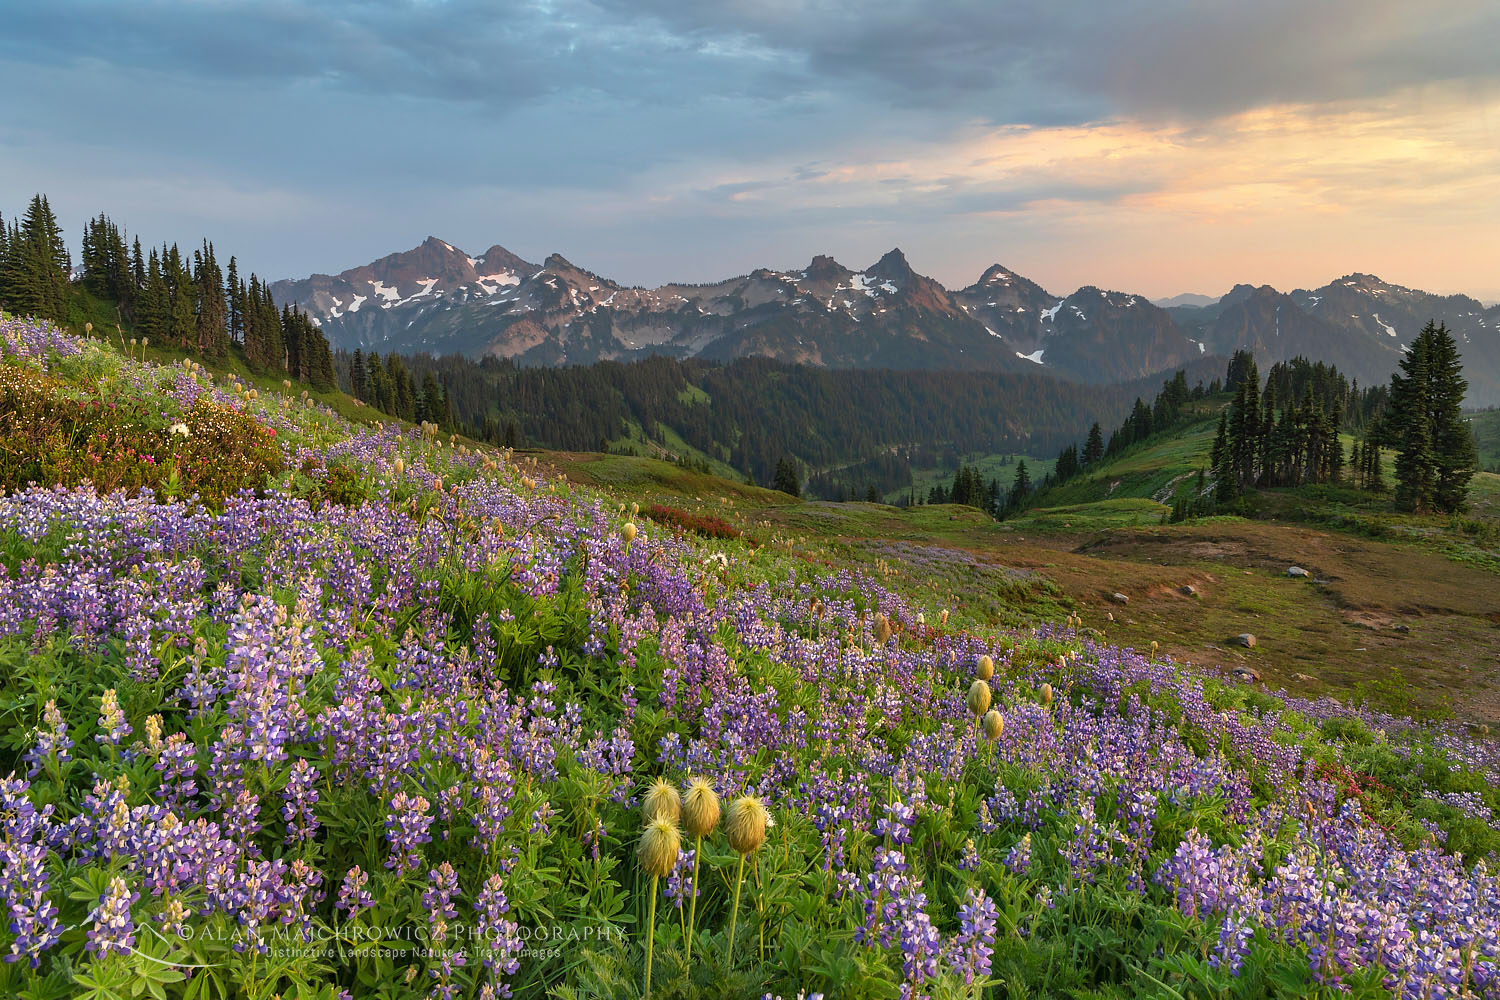
 Tatoosh Range Paradise Wildflower Meadows #73159 Purchase
Skyline Trail: This is the main trail that makes a loop through the entire Paradise area. This scenic trail makes an excellent leisurely all-day loop. However, be aware that the higher elevation part of this trail traverses mostly rocky alpine terrain. Nearly all of the best flower meadows are at middle elevations on the western parts of this trail.
There are many great compositions to be had around 5800′ elevation by using the trail network between Skyline and Deadhorse Creek Trails.
Deadhorse Creek, Moraine, Nisqually Vista Trails: The main attraction for all of these trails are the views of Mount Rainier and the yawning chasm below the Nisqually Glacier. Deadhorse Creek trail connects with the Skyline trail so a loop will offer both glacier views and great wildflower photos.
Golden Gate Trail: This mile-long trail begins on the lower Skyline at Myrtle Falls, and ends at the upper Skyline Trail on Mazama Ridge. There are some great flower groupings all along this trail, especially near Myrtle Falls. Make sure you check out classic compositions of both Edith Creek from the footbridge and Myrtle Falls from the lower overlook.
The downside of the Golden Gate trail is that views of Mount Rainier are partially obscured by Panorama Point Ridge. However, this trail is great for including the Tatoosh Range in compositions instead. There are some wonderful flower groupings on the upper section switchbacks for use in such compositions.
 Tatoosh Range from Mazama Ridge #73153
Mazama Ridge Paradise Meadows
Mazama Ridge can be accessed by several different trails. It can be reached via the Skyline Trail from the Paradise Meadows parking area, or from below at Reflection Lakes. Keep in mind that if you are starting from Reflection Lakes you will have a considerable amount of elevation to gain before reaching the best areas.
Due to the nature of the snowpack melting out many of the best wildflower displays on Mazama Ridge often bloom a bit later than elsewhere in Paradise.
Skyline Trail on Mazama Ridge: Access is either part of the Skyline Loop or from the end of the Golden Gate Trail. I feel the upper part of Mazama Ridge on the Skyline Trail offers the best photo opportunities. This is mainly due to the more open views of the Tatoosh Range.
Lakes Trail: While there are some good photo ops on this trail they are mostly the upper half. One of the benefits of this trail is that the views of Mount Rainier are set back a bit.
Paradise Glacier Trail: This trail begins on the upper part of Mazama Ridge. For the most part, it travels through fairly barren rocky terrain. But there are some decent flower displays along the first half mile or so. The attraction on this trail is viewing the raw landscape that not too long ago was beneath glaciers.
Some of the best displays of Lewis’s Monkeyflowers are near the junction of the Paradise Glacier and Skyline trails. Here they grow alongside streams thick with bright green mosses. Unfortunately, it’s difficult to include a satisfactory view of Mount Rainier or the Tatoosh Range in photos from this spot.
 Edith Creek Mount Rainier #3522 Purchase
Myrtle Falls Edith Creek Paradise Meadows
These classic locations are only a half-mile from the Paradise parking area on the Skyline Trail. Both photograph well in morning or evening light with a preference for sunrise.
Be aware that this is one of those locations that can be crowded not only during the day but during golden hour light. This is a very popular spot for photo workshops and wedding photographers. Please be considerate of other photographers, especially those photographing newlyweds.
 Myrtle Falls Mount Rainier #72865 Purchase
Also, use caution at the overlook to Myrtle Falls. It’s a small cliffside viewing area which can be a bit dangerous for you and your gear when surrounded by overzealous visitors. Early in the season dangerous snow bridges and slippery snowpacks can prove fatal, exercise extreme caution or avoid the overlook completely at this time!
 Reflection Lakes Mount Rainier #73126 Purchase
Reflection Lakes
The roadside view of Mount Rainier from Reflection Lakes is one of the classic photographic vantage points in the park. One can easily argue it’s one of the most classic views in the entire Pacific Northwest!
To get here just take the road turnoff to Stevens Canyon just below Paradise Meadows, or follow Paradise Valley Road east from the Visitor’s center parking lot.
Essential Tip #5: This is a primarily sunrise location. Like many classic national park photo locations, it attracts hordes of photographers and workshops. Plan on setting up in the best spot at least an hour before sunrise. Bring a headlamp and a thermos of coffee! And of course please heed the signs and help preserve fragile areas by staying out of closed areas.
Landscape photography doesn’t get much easier than at Reflection Lakes. Parking is right alongside the lake so theoretically, you don’t even need to get out of your car! Of course, getting the best photos will involve a bit more than that. It will be to your advantage to scout out the best spots the day before so you won’t be guessing in the dark the next morning.
 is in the foreground. Mount Rainier National Park Washington #73108or") Reflection Lakes Mount Rainier #73103 Purchase
Reflection Lakes Mount Rainier #73103 Purchase
I feel the best spots are on the eastern end of the lake where small groups of wildflowers can be used in the foreground. This is also one location that will provide great photos whether you are there during or after wildflower season. On a cold fall morning, there are often thin sheets of ice on the very photogenic lakes.
Essential Tip #6: Don’t make the mistake of setting up your tripod and photographing only one composition. Pick out the best primary spot and wait to photograph it in the best light, then move on to other compositions.
 Bench Lake Mount Rainier #73143 Purchase
Bench Lake
This is a great sunrise location with wonderful views of Mount Rainier that not many photographers visit. The view of Rainier from Bench Lake shows more of the lower part of the mountain than at Reflection Lake. However, you are limited to a tiny stretch of sand along the lake for compositions.
Bench Lake is an extra doable location after photographing sunrise at Reflection Lake if you still have some nice early morning light to work with. Drive about 1.5 miles east of Reflection Lakes to reach the trailhead to Bench and Snow Lakes. The lake is about 1.25 miles along the trail with some minor ups and downs along the way.
 Pinnacle Peak Trail Mount Rainier #72992 Purchase
Pinnacle Peak
If you have extra time during your trip a hike up to Pinnacle Peak is definitely worth the effort. The trail starts across from Reflection Lakes and is about 1.25 miles in length with about 1400′ of elevation gain. It feels longer than 1.25 miles but the increasingly dramatic views of Mount Rainier keep your mind off the work.
There are several good spots along the trail for photos which include wildflowers or hikers on the switchbacks. Just west of the saddle at the trail’s end there are a few spots to sit and get some pics. If you’re up for it you can continue the steep route to Plummer Peak. For the adventurous photographer continue hiking east on a rough semi-exposed trail to a saddle above Pinnacle Glacier. The views of Mount Rainier from there are wide open.
Essential Tip #7: Photography from the Pinnacle Peak trail is best in the evening light. Bring water and wear a hat, this trail can be very hot in the afternoon during the summer. Make sure to bring a headlamp for the way down if you’re planning on golden hour photography.
 Christine Falls #73210 Purchase
Christine and Narada Falls
These two waterfalls are an absolute must photograph when you’re in the area. Both are very easy short walks from the road and both offer perfect compositions from the viewing areas. As with most waterfalls, they are best photographed on an overcast day, or in the early morning or evening when they are in shade.
Essential Tip #8: Like nearly every location in a national park try to avoid photographing these waterfalls during the crowded busy part of the day. Before 9:00 am or after 5:00 pm is best, then you’ll probably have them all to yourself.
 Narada Falls #72871 Purchase
Camera Equipment Suggestions
What camera gear should you bring on a Mount Rainier photography trip? In a nutshell, everything you have. Ok, maybe not everything, especially if you’re a gear junkie with dozens of lenses and camera bodies.
If you’re using a camera with a full-frame sensor the most useful focal lengths are 14mm-70mm. So basically ultra-wide to very slight telephoto should cover most compositions. The only time I used my telephoto lens was to zoom in on some glacier details.
Basic Essentials:
-
- Tripod
- Wide to ultra-wide lenses
- Normal range lens
- Telephoto lens; for landscapes up to 200mm would be good enough. Paradise Meadows isn’t known for wildlife photography so long telephotos aren’t necessary.
- Polarizing filter
- Graduated Neutral Density Filters; I still use these in the field in certain circumstances instead of creating the effect in post-processing. Although they are not always the best option.
- Remote shutter release
- Bug Spray!
Essential Tip #9: Brush up on your focus stacking techniques. Since you’ll probably be photographing wide-angle compositions with wildflowers in the foreground and Mount Rainier in the background you’ll need to use methods that increase your depth of field.
Essential Tip #10: Mosquitoes, gnats, and other flying insects will be especially bothersome during times around sunrise and sunset. The same time when you will need to concentrate on your photography. Bring insect repellant or wear netting.
Essential Tip #11: BE CREATIVE! Use your own eyes and mind. Just because 20 other photographers are photographing the same scene, in the same position, with the same gear and settings, doesn’t mean that you have to follow suit. Photographing something uniquely and creatively could be as simple as just turning around to see what’s behind you!
 Reflection Lake Sunrise Mount Rainier #73082 Purchase
In Conclusion
Combining all the information and tips in this post and Paradise Meadows Mount Rainier Photography Trip Planning, you now should have everything you need to know to have a productive, safe, and enjoyable trip to Paradise Meadows. Now get out there and have fun!
Thanks for reading, feel free to share this post with your friends and colleagues!
Want to learn more, or have a professional photographer guide you in the field? Then take your Creative Photography to the next level with Private Instruction and Guided Photo Tours.
All photos appearing in Photographing in Paradise Meadows Mount Rainier are available for Commercial Licensing and Fine Art Prints. Click on any image to purchase, or contact me for more info!


 Tatoosh Range in Winter #5019


