Southern Utah Travel Tips
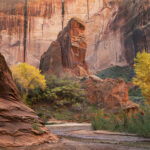
 Capitol Reef National Park #75488 Purchase
*This post is a fairly long read
Have all my recent Southwest Utah image additions inspired you to visit some of these locations? Are you thinking of just a leisurely vacation, or maybe a full-blown photography expedition? Well, read on, in this post I have some practical advice on how to make your trip more enjoyable and less stressful! And just as importantly how to responsibly visit these special places.
*Most of the tips in this post are for camping and adventure-oriented trips. Since I rarely stay at motels or lodges on my excursions I can’t offer reliable advice on them.
There are two things you must keep in mind when visiting Utah’s national parks and monuments. The first is, THEY WILL BE CROWDED! Secondly, all those people are putting incredible stress on every aspect of the environment. From litter, vehicle air pollution, traffic jams, crowded trails, souvenir hunting, and even unsightly graffiti and vandalism, all our parks are under extreme pressure.
 Zion National Park Shuttle Bus
To meet these challenges the National Park Service, Forest Service, and many state parks now employ reservation systems, entrance quotas, and even lotteries to enter, camp, and hike in popular areas. Also, many parks are now on a shuttle bus-only system for getting around. Gone, perhaps forever, are the days when you can just arrive at a national park have your pick of a campsite, and drive your car to an uncrowded scenic vista at leisure.
Of course, there are still plenty of spectacular areas that are wide open for random camping and exploration and are also free from entry fees and reservations. Just keep in mind that many of those off-the-beaten-path destinations can be more difficult to get into, and out of. For these areas advanced research and planning are essential. Know your limitations before you head out!
Zion National Park #76741 Purchase
Limit Your Southern Utah Destinations
Yes, the Golden or Grand Circle tour of national parks is a spectacular must-do trip for many. While on the road I’ve often overheard people talking about how they are doing the entire tour in five days, or less. To me that’s insane! With an itinerary like that you’re pretty much spending all your time driving from park to park every day with little time left to stop and actually enjoy the parks.
Limit your destinations to within the time you have available. Southern Utah has so much natural beauty to explore that it would be a crime to try and cram everything into one trip. Pick one or two destinations and set aside enough time to really enjoy them. You can always come back on another trip for new experiences.
Recreation.gov Love it or Hate it
There is no way around it, you will need to use Recreation.gov for reserving just about everything on your trip. It covers campsites, trail and climbing permits, lotteries, museum entrance fees, and lots more. Recreation.gov can make your trip less stressful, or incredibly stressful.
Many people including me see Recreation.gov as a monopoly akin to Ticketmaster for outdoor recreation. For one there mostly are no alternatives you can use for making reservations. Secondly, they charge service fees for all transactions which are often more than the actual fee for the activity. So planning a visit to Arches or Zion is now comparable to getting tickets for a popular concert.
 A Lottery/Permit system is in place for the Subway hike in Zion #76842 Purchase
Recreation.gov is great if you plan every detail and day of your trip far in advance. With reservations in hand, you just show up at the park or campsite worry-free. But if you’re like me and you require flexibility in your itinerary then you’re in for a bit of a challenge. This is not only due to limited availability but also to accessing the Recreation.gov app. while on the road. Even with an excellent cell signal, the app can be excruciatingly slow. Of course, you can also call Recreation.gov directly but the wait can be frustratingly long to speak to an actual human. Also when you’re on the road there are often huge dead zones where you’ll be out of luck.
Essential Tip: Always check out in advance the websites of the parks or monuments you plan to visit. Entrance fees and reservation policies are changing nearly every year. For example, in January 2020 Zion National Park implemented a lottery system for hiking the popular Angel’s Landing trail. Park websites will also prominently post any alerts to road and trail closures.
Bryce Canyon National Park #76510 Purchase
BLM Options in Southern Utah
If your trip relies on camping and you’re out of luck in the reservation system don’t despair! The BLM (Bureau of Land Management) manages huge tracks of the desert southwest. Most BLM land offers free campgrounds and random camping. In fact, some of my favorite camping spots are on BLM land and are often my first choice. With good maps and instinct, you can often find a free campsite all to yourself in spectacular surroundings.
But just remember these spots are almost always primitive, with no water, restrooms or outhouses, picnic tables, or garbage receptacles. Always be prepared, and make sure you have plenty of water and a full tank of gas.
And don’t forget, if you can pack it in full you can pack it out empty!
Learn the Rules & Beat the Crowds in National Parks
You’ve made your reservations, arrived at the park, paid your entry fees, and set up camp. Now you are ready to have fun and explore. Great, but here are a few tips before you head out.
The first thing I do after arriving at a national park is to read the park newspaper and pay a visit to the visitors center. As I’ve mentioned many times already, all National Parks are in a constant state of change to keep up with the ever-increasing amount of visitors. You’ll need to get all the current information available regarding trail and road status, shuttle bus schedules, COVID policies, and more. It’s also a good idea to visit any interpretive exhibits to gain a better understanding of the park’s natural environment. You may also need further permits and reservations for certain trails and areas only available at the visitor center.
Sunrise Zion National Park #76619 Purchase
The Early Bird and Late Bird Beats the Crowds!
To beat the crowds it’s a good idea to adopt the methods of professional photographers, get up early, really early. You will definitely not regret this tip. The busiest times in any national park are between 10:a.m. and 5:00 p.m., give or take. Those hours are also the worst times of day to view wildlife.
If you want to enjoy that amazing scenic vista or trail and have it all to yourself then you need to be up and about before sunrise. I can’t tell you how many times I’ve been in a crowded park and enjoyed a gorgeous sunrise with hardly anyone else around. Several hours later the light will be all washed out. Plus you’ll be in a mosh pit of other gawking visitors.
This also, for the most part, goes for sunset. Most people are back in camp or town having dinner while the light warms up again for the evening show. My standard schedule is to be at my desired location at least an hour before sunrise or sunset. I’ll spend the middle part of the day scouting or relaxing before heading out again for sunset.
Essential Tip: If you’re planning on visiting several national Parks or Monuments over the course of a year then an annual America the Beautiful pass is a good investment. Most park entrance fees are in the $35 range, so you can save quite a bit on a Utah parks tour.
Best Times to Visit Southern Utah
This of course depends on the nature of your trip. I plan my trips for photographing seasonal events like fall colors or peak wildflower blooms. I need to be in specific areas within a specific time frame and have a flexible schedule. Others may simply want a leisurely sightseeing vacation. However, the parks will be very busy in whatever season you choose.
 La Sal Mountains from Arches National Park #57917 Purchase
Spring in Southern Utah
This is one of the best seasons for visiting Utah’s Parks. In spring the temperatures are relatively mild and comfortable. Desert wildflowers are out and new green leaves on trees are a brilliant contrast to the red rock of the region. Also, in Arches and Canyonlands National Parks, the snow-covered La Sal Mountains provide a stunning backdrop. For these reasons, spring may also be eclipsing summer as the busiest time of year.
Spring comes early in the Southwest and I think March to mid-April is the best month to visit in the spring. February can still be pretty chilly, especially in the high altitudes of Bryce Canyon. And by the end of April, it’s already beginning to get uncomfortably hot.
Fall color Zion National Park #76599 Purchase
Fall in Southern Utah
My favorite time to visit Southern Utah is in the fall. Like spring the temperatures are mostly mild and the fall colors are spectacular. Fall is also one of the best seasons for canyoneering. The weather is much more settled, reducing the threat of flash flooding.
Fall comes late in the Southwest. Early to mid-October can still be quite warm, and color doesn’t reliably arrive until mid-to-late October. The best time to see fall colors in Zion National Park is during the first weeks of November. Of course, elevation plays a key role here. At higher elevations groves of aspens can be at their peak color in late September.
Grand Staircase-Escalante National Monument #76373 Purchase
Summer in Southern Utah
I would avoid a trip anywhere in the Southwest during summer. The heat is nearly always oppressive, and it can be deadly if your trip involves hiking or backpacking. Despite the heat, summer may be the only option for some, especially those with families. For this reason, this summer is usually the most crowded season in the Southwest.
Summer is also the monsoon season in the Southwest. Summer monsoon season is not recommended for those planning canyoneering trips. Slot canyons in particular are extremely hazardous this time of year. A calm sunny day is no guarantee of safe travel. Storms can form many miles away and dump huge quantities of rain in minutes. All that water creates deadly flash flooding in canyons, which of course is how they were formed in the first place.
 Fresh snow in Red Canyon #32093 Purchase
Winter in Southern Utah
This is rapidly becoming the new popular season among those desperate to escape the crowds. Some locations like Bryce Canyon, which sits at around 8000′, can be magical with a fresh dusting of snow on the red and orange hoodoos. Lower elevation areas can still be chilly but not uncomfortably cold.
Road conditions can be the biggest concern for a winter visitor. Main roads and highways are generally well maintained. However, it’s the unpaved gravel, dirt, and sand roads that are a problem. All of those roads turn into an inescapable quagmire after heavy rains. While the winter rains and snow are more moderate than the summer monsoons, there is not enough solar energy to dry them out enough for safe travel.
Trailhead Grand Staircase-Escalante National Monument #75933
Safely Visiting Southern Utah
Any trip to the desert Southwest can easily turn into a disaster. As the legendary polar explorer Roald Amundsen once wisely said:
“Adventure is just bad planning*”
*Unlike today back then the definition of adventure was not synonymous with fun, e.g. the Donner Party had an epic adventure.
Although you’re unlikely to fall into a glacial crevasse or die in a blizzard, there are some serious life-threatening conditions to be aware of. The tips offered below are fairly basic starting points to get you thinking. They are not all-inclusive of hazards you need to be aware of on a trip to the desert.
Water: Always, always carry water, everywhere you go. It’s frightening how easy it is to get quickly dehydrated in the desert. I carry a hard-sided 7-gallon water in my vehicle and top it off every chance I get. On hikes, I carry a 3-liter hydration reservoir in my pack filled with a sports drink.
 Flash flood debris high in slot canyon #37342
Weather: To ensure a safe and enjoyable trip careful weather monitoring is essential. This is especially true when hiking in any slot canyon or dry wash. Flash floods can occur from storms many miles away. Just like filling up on water and gas before you head out to a remote spot you should load up on several weather forecasts.
Sun: Even on a mild spring or fall day the sun can feel burning hot. Unless you’re hiking in a deep canyon with tall walls it can be difficult to find shade. Always carry and use plenty of good sunscreens. Heat and sunstroke are serious issues that can come on very quickly in the desert. Know the warning signs and immediately get in the shade and drink plenty of fluids if you or your companions are in danger.
The author after a tussle with mud and quicksand in Coyote Gulch #76355
Quicksand: Yes it does exist, but in my experience, it’s not like what you see in old western tv shows and movies. You will encounter it mainly along streams in canyons, especially after heavy rain. If you’re walking on a bank along a creek that suddenly quivers like jello and liquefies under your foot that’s quicksand. It’s easy enough to extract your foot if you’re alert and don’t proceed any further. If you get both feet in it you’ll have more trouble extracting yourself and may lose a shoe. But you won’t slowly sink to your death like in the movies.
Essential Tip: Always know your limits, do your research, and don’t get in over your head. Online trip reports can easily mislead you, The experience level of whoever wrote the report can be very different from your own. I’ve read some trip reports promoting the Sneak Route into Coyote Gulch as an easy alternate entry point. In reality, it is close to a technical canyoneering route with a great deal of exposure, and it usually needs ropes for a safe entry and exit.
Utah State Highway 95 #74968 Purchase
Cell Signals in Southern Utah:
It should be obvious, but don’t depend on being able to get a good cell phone signal in Southern Utah. There are huge dead zone areas, especially in Grand Staircase-Escalante National Monument and Glen Canyon Recreation Area. Mountains, buttes, and canyon walls can easily cut you off from a signal. Even in some small towns and national parks the signal can be spotty.
Unpaved Roads in Southern Utah
As I mentioned above unpaved roads can easily become a trap for you and your vehicle. Nearly all dirt roads are completely impassable after rain and during winter. When wet these roads become a gooey mess of mud that even a monster 4×4 would have difficulty getting out of. Even a small puddle in an otherwise dry dirt road can get you stuck.
Some roads cross deep sand which can trap all but 4x4s and some cross very rough sections of slickrock. Even some of the best-maintained gravel roads can be challenging. Hole in the Rock Road, a wide heavily traveled road south of Escalante, is routinely covered in bone-jarring washboards. After I drove over 20 miles of washboard on this road I thought my truck would fall to pieces when I stopped.
Moki Dugway, some roads have steep unguarded drop-offs #74769
Essential Tip: This should be common sense but if there is a road sign that states “4×4 vehicles only” it means it! Getting a tow truck out to a remote area can cost hundreds if not thousands of dollars, assuming you can find a ride back into town to get one!
Hiking in Southern Utah with Maps and GPS
I’m not a big fan of GPS devices, I don’t use them and have always relied on physical maps on hikes. When hiking in some complex canyons such as those in the Escalante drainage it is extremely important to not completely rely on maps or GPS. While both can be important navigation aids you will be using your navigation skills and common sense to find the correct route.
Cairn marking route on trail Canyonlands National Park #74696
Many of these areas can be a maze of side canyons obscured by thick vegetation, losing the correct route is much easier than you may think. Even the most detailed maps and GPS may not contain the info needed to make a wise choice in navigating them. The tall narrow walls of some canyons can also block out a good signal for your GPS. Also, trails in canyons marked on a map or in a guidebook can be nonexistent by the time of your visit. A well-marked easy-to-follow trail can disappear overnight in a flood.
Essential Tip: In some areas, small rock cairns are necessary to mark the correct route. Do not remove them. And don’t add additional decorative cairns.
Essential Tip: Before heading out to a remote area pay a visit to the nearest ranger station for the latest weather report and current info on road and trail conditions. You can also check in with the local outdoor store or guide service for a second opinion. These folks live work and play in the area and could offer valuable info not available elsewhere.
* However it’s been my experience that the young clerk at the local gas station doesn’t have a clue to offer.
Leave No Trace, Physical Digital & Archeological
I’ve been adding this topic to the end of many of my posts. However, in light of my recent firsthand experience, I’m bumping it up and expanding it. In addition to traditional LNT, I want to talk about Digital LNT and Archeological LNT here.
If you’ve never come across this term you definitely will on your next SW trip. Its most basic definition means to take only pictures, and leave only footprints. Sounds like common sense and common courtesy to the environment and future visitors right? In the Desert Southwest, the leave only footprints part has an important twist to it.
Cryptobiotic Soil #74929
Cryptobiotic Soil:
If you haven’t heard of LNT then you probably haven’t heard of Cryptobiotic Soil. In the desert, this crusty popcorn-like soil is everywhere. It is the key to preventing the desert from being blown away into oblivion by wind and washed away by rain. The term relates to the thin crust of soil held together by fungi, lichens, cyanobacteria, and more. Undisturbed on its own it prevents the loose soil and sand beneath it from being eroded. It’s this soil that also gives plants a foothold in a tough environment.
This soil is incredibly fragile and can be destroyed by the slightest footprint. Regeneration can take decades under optimum conditions. So stay on the trail and don’t be a Crust Buster. If you absolutely must leave the trail where this soil is present then walk on durable surfaces like stones or slickrock.
To learn more about the principles and practicing LNT please take a few minutes to visit the Leave No Trace Center for Outdoor Ethics. Your children and grandchildren will thank you!
Seven Leave No Trace Principles
-
- Plan ahead and prepare.
- Travel and camp on durable surfaces.
- Dispose of waste properly.
- Leave what you find.
- Minimize campfire impacts (be careful with fire).
- Respect wildlife.
- Be considerate of other visitors.
Ruins in Bears Ears National Monument #74879 Purchase
LNT for Archeological Sites:
The Southwest is home to many fascinating archeological sites that are both historically important and culturally sacred. It is awe-inspiring to see these sites in person, and it’s extremely important to make sure they remain intact for future generations. Learn more about them at the Bears Ears Education Center
-
- Leave All Artifacts in Their Place
- Don’t Disturb Fossils or Bones
- Don’t Touch Rock Art or Add Your Own
- Stay Off Walls and Structures
- Dogs and Archeology Don’t Mix
- Camp & eat Away From Archeology
- Avoid Building Cairns
- Don’t Reveal GPS Info
Glen Canyon National Recreation Area #76264 Purchase
Digital Leave No Trace
While the principles of LNT are pretty easy to understand and practice, DLNT is more difficult to implement for some. The basic idea is in response to the onslaught of crowds, resulting from everyone posting pictures on social media of locations from their latest trip. DLNT offers some guidelines to help moderate this trend, or at least make people a bit more aware of their actions.
For me, this is a tough one to deal with. I am painfully aware that I’m part of the problem. I have been wrestling with my response for quite some time. Since my livelihood is landscape and nature photography it’s just not that simple for me to stop posting pictures and writing posts like this. If I stop marketing my photography then eventually my family and I are living on the street.
So what to do? At the very least I will be vaguer when applying captions and titles to social media posts. For example, the above photo was captioned Glen Canyon National Recreation Area, which is a huge area of complex canyons. Using just this caption info you’ll probably never be able to identify the location where the photo was made. However, a determined reader would probably find a few clues as to where it is both from this post and elsewhere online.
Below are some digital leave-no-trace guidelines offered by the folks at Leave No Trace. I encourage you to click the link to learn more about the guidelines below.
-
- Think Before You Geotag
- Be Mindful of What Your Image Portrays
- Encourage and Inspire Leave No Trace on Social Media Posts
- Give Back to Places You Love
- Shaming is Not the Answer
Learn about how to protect the places we love to photograph
Visit the Nature First Website

Natural Bridges National Monument #74920 Purchase
Next Up: Southern Utah Photography Tips
Thanks for reading, feel free to share this post with your friends and colleagues!
Want to learn more, or have a professional photographer guide you in the field? Then take your Creative Photography to the next level with Private Instruction and Guided Photo Tours.
All photos appearing in Southern Utah Travel Tips are available for Commercial Licensing and Fine Art Prints. Click on any image to purchase, or contact me for more info!
Southern Utah Travel Tips
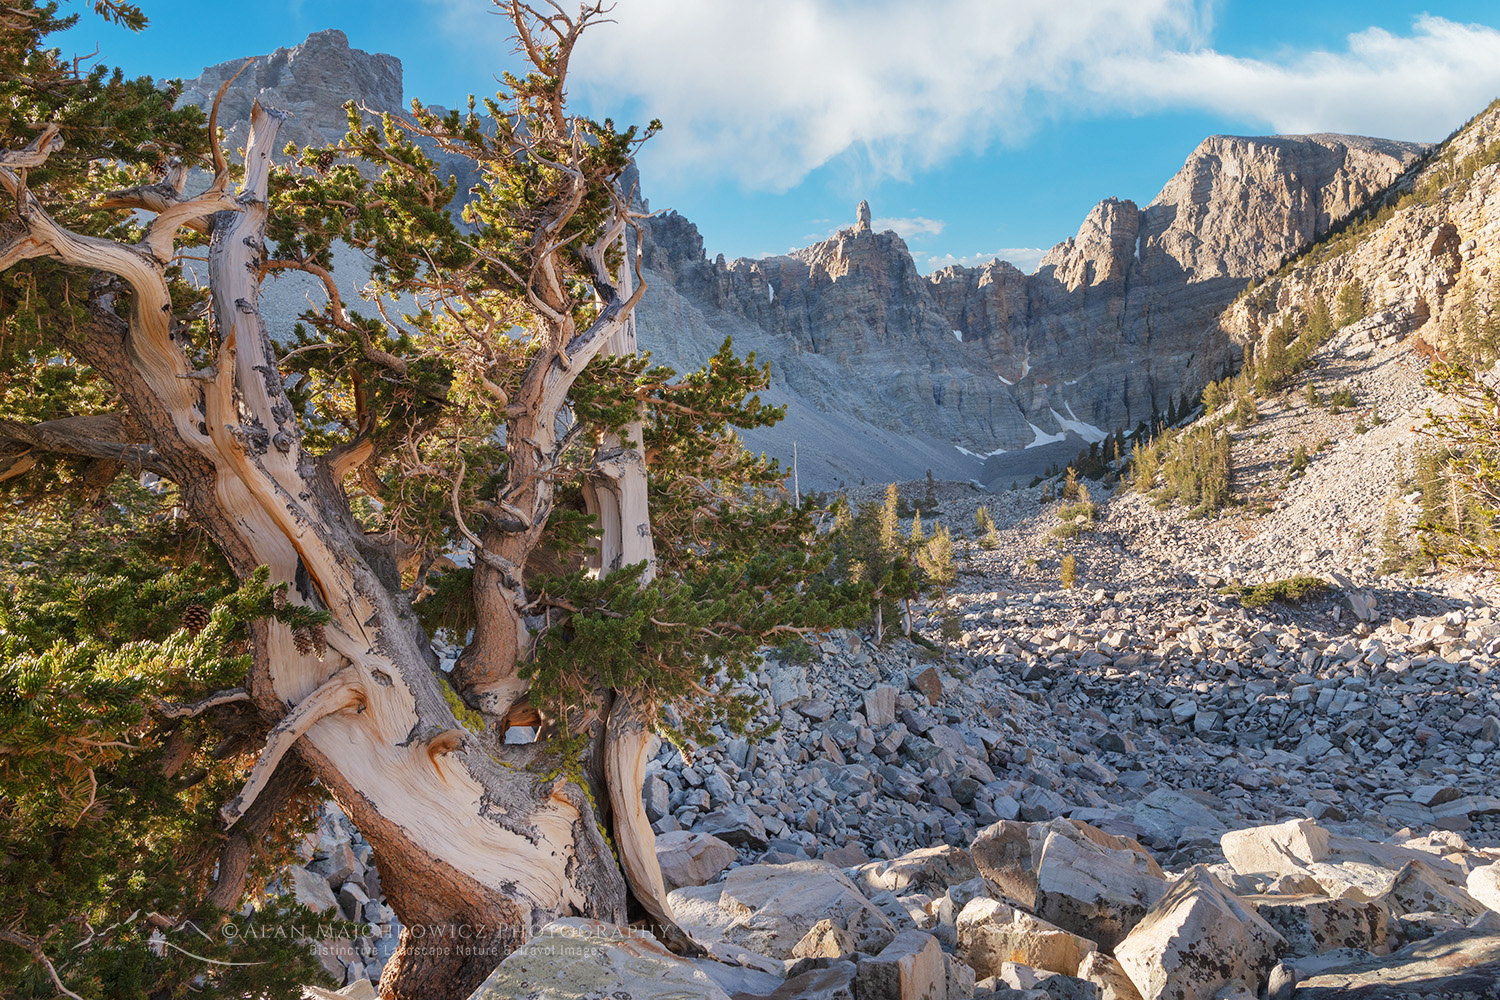
 below Wheeler Peak. Great Basin National Park Nevada #84475") Wheeler Bristlecone Pine Grove #84475 Purchase
Wheeler Bristlecone Pine Grove #84475 Purchase below Wheeler Peak. Great Basin National Park Nevada #84480") Wheeler Bristlecone Pine Grove #84480 Purchase
Wheeler Bristlecone Pine Grove #84480 Purchase below Wheeler Peak. Great Basin National Park Nevada #84489") Bristlecone Pine Great Basin National Park #84489 Purchase
Bristlecone Pine Great Basin National Park #84489 Purchase below Wheeler Peak. Great Basin National Park Nevada #84507") Bristlecone Pine Great Basin National Park #84489 Purchase
Bristlecone Pine Great Basin National Park #84489 Purchase Lehman Cave Great Basin National Park #84465 Purchase
 Lehman Cave Great Basin National Park #84465 Purchase
 Lehman Cave Great Basin National Park #84465 Purchase
 wood. Great Basin National Park Nevada #84590 Photographing Great Basin National Park") Bristlecone Pine Great Basin National Park #84590 Purchase
Bristlecone Pine Great Basin National Park #84590 Purchase
 wood. Great Basin National Park Nevada #84556") Bristlecone Pine Great Basin National Park #84556 Purchase
Bristlecone Pine Great Basin National Park #84556 Purchase


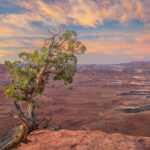


 at dawn on rim Green River Overlook, Canyonlands National Park Utah")


 is in the foreground. Mount Rainier National Park Washington #73108or")


 Tatoosh Range in Winter #5019


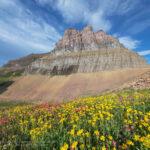
 at Boulder Pass")


 Glacier National Park")