Eroded sandstone concretions and formations at Shore Acres State Park Oregon. #68579or

What is it like to be a Professional Landscape Photographer?

Nearly every time I’m on location photographing, someone will approach me, and we start a conversation about photography. They often ask if I’m a professional landscape photographer. When I answer yes, they begin to ask the usual questions, such as “How do you sell your work?” and “It must be wonderful to travel all over and take beautiful photos.” My standard reply to their questions is, that yes, in many ways it truly is a dream job. But I quickly add that it also is a very difficult and challenging way to earn a living.

Eroded sandstone concretions and formations at Shore Acres State Park Oregon. #68579or What is it like to be a Professional Landscape Photographer?Shore Acres State Park, Oregon #68579or  Purchase

Being a professional landscape photographer selling fine art prints and licensing images for over 35 years, I have some honest truths to share. So this post is for those of you out there who may be interested in what it’s like to be or may want to become a professional Landscape Photographer.

*Disclaimer: These are only my personal experiences and observations, and mainly relate to the niche of being a landscape photographer. Most photographers will agree with some or all of the points I make below. However, every photographer has different experiences, approaches, skills, and resources available to them. So this isn’t a one-size-fits-all scenario.

East Temple and Temple Peaks are reflected in Deep Lake. Bridger Wilderness Wind River Range Wyoming #78671or What is it like to be a Professional Landscape Photographer?
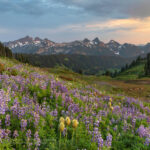
Deep Lake Wind River Range  #78671or  Purchase

So what is it like to be a landscape photographer?

A career in landscape photography can certainly sound like a glamorous dream job. But it isn’t for everyone, and it entails many aspects that most people don’t think of, or willingly choose to ignore.

You will spend most of your time in the office, not in the field. It’s easy to imagine a career of constant traveling and photographing in beautiful locations. But those gorgeous award-winning images don’t fly out of your camera on their own and sell themselves. Besides editing and processing, you need to promote yourself, find clients (a lot of them)), establish business relationships, and much more. And you must do this not just once, but over and over again, every day, and every year.

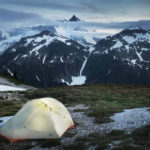
Being on location isn’t always a picnic. Creating great images requires planning, hard work, plenty of time, and often luck. The chances of getting those beautiful images you see on Instagram on a quick easy trip are incredibly rare. You’ll often need to backpack in, camp out, and stay put for days waiting for the right conditions, often in lousy weather while being tortured by plaques of mosquitos and flies. Winter landscape photography presents its own unique, difficult, and sometimes dangerous challenges. When not backpacking I always camp out in the back of my Toyota Tundra. Staying in a comfortable motel every night is usually impractical and too expensive.

Every trip isn’t successful. Thinking that every day you’re on location will be filled with gorgeous light and mind-boggling compositions is a recipe for disaster. It just doesn’t happen. I’ve been on trips lasting many weeks with only one or two instances of great, or even just decent light. Browsing through Instagram and following well-known photographers can be misleading. Those photographs only show their best images. And there’s no way of knowing how many days or return trips it took to make that image. There are certain locations I’ve returned to over and over again without coming away with any successful photos.

Pressure and stress are constant companions. When on location there is the constant pressure to come back with great new marketable images. You’ve put a lot of time, money, and energy into getting to that special location. The last thing you want is to return home with nothing to show for your efforts. And of course, back in the office, there is the pressure to get those new images out to photo editors and art buyers, and somehow persuade them to use those photos, so you can pay the bills. 

You’ll need to constantly add new images to your archives. You can only rely on marketing your existing portfolio of images for so long. Most art buyers and photo editors will want to see new and exciting images every year. Submitting the same images over and over makes them believe you’re not seriously committed to your business. They’ll eventually move on to other more productive photographers.

You are an independent freelance business owner. Do you enjoy looking for work, sending out your resume, and applying for jobs? Probably not, but you better because as a freelancer you’ll be doing it every day for the rest of your life. There is no such thing as a regular paycheck in this business. That photo editor or art buyer you just spent so much time convincing to use your image in a project? Well, you’ll have to do all over it again tomorrow, and the next day, and the next day…

There is a lot of competition. In the past you may have competed against several thousand other professionals. But digital imaging and social media have instantly made everyone good enough to be a professional photographer. Now you may be up against several million. And the number gets bigger every day.

You’ll need to wear a lot of hats. Unless you have a bottomless bank account you’ll need to become a DIY expert. That includes marketing, IT, web design and maintenance, SEO (Search Engine Optimization), business management, amateur meteorology, natural history, handyman, and much more. All that is on top of becoming an expert in all the various photo editing and business apps you’ll need to use daily.

You most likely won’t get rich.  Yes, there are exceptions to this. There are professional landscape photographers who do quite well. But in reality, they are few and far between. The ones at the very top are usually very shrewd business people, with exceptionally good marketing and sales skills. The days of big-budget assignment work and lucrative stock image sales are long gone. Meanwhile, the advent of AI imaging is certain to make things even more difficult for everyone.

Fall color along the Virgin River Zion National Park Utah #76602Zion Canyon in fall color #76602  Purchase

Benefits of being a Professional Landscape Photographer

You are doing something that you love for a living. Over the years I’ve thought of different career paths I might have taken, or doing it all over differently. But I honestly can’t think of anything I’d rather do, despite all its difficulties.

You get to visit and see amazing places and things. I often go to places multiple times that are on the once-in-a-lifetime bucket list of others. One of my favorite memories was photographing in the Westfjords of Iceland. I was sitting on a bluff overlooking the Greenland Sea. In the distance was a thick bank of fog glowing yellow and orange in the midnight sun. There was no one else around and it was perfectly quiet except for the sound of sheep bleating contentedly in the distance. A magical experience that you won’t get on a cruise ship or commercial bus tour.

You get to meet interesting people.  While on the road and trail, I’ve met people from all over the world, traveling for all sorts of reasons. I’ve met people who live on the road in a van or tiny compact car, just traveling to wherever or whatever seems interesting to them. Once I met a young man who travels to all the natural hot springs in the western states just to clean up the trash and keep them in good shape, for nothing in return. The list goes on and on.

You get to share your knowledge and experiences with others. Through teaching the occasional photography/nature workshop I get to help others improve their photography skills and appreciation of our natural environment.

You can be part of something bigger and be an inspiration. Over the years my images have been used by organizations I believe in to help promote and further their cause. I’ve also sold fine art prints to people which helps them reconnect to a special memory or time in their life.

You get to regularly disconnect from the stresses of the digital world. Being alone and photographing our natural world, away from cell phones, television, and the general deafening and mind-numbing cacophony of our digital existence is one of the most cleansing and reinvigorating things I can think of.

Fogo Island sunset from East Tickle, Newfoundland and Labrador Canada #80143 What is it like to be a Professional Landscape Photographer?Fogo Island sunset Newfoundland  #80143  Purchase

In conclusion, being a Professional Landscape Photographer is incredibly rewarding but also very difficult. To the uninitiated, it may seem like the challenges outweigh the benefits. But for me, it’s the other way around. The greatness of the benefits always overcomes the challenges.

I truly love what I do despite the sacrifices and frustration that goes with it. It’s part of me, defines who I am, and compels me to keep on learning, seeing, and appreciating our natural world.
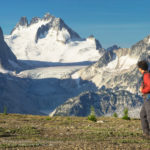
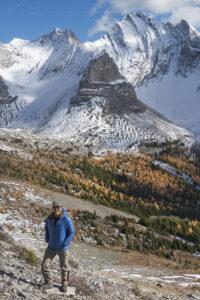
Hiker in Arethusa Cirque Kanansakis Country AlbertaThe author at Kananaskis Country Alberta

What is it like to be a Professional Landscape Photographer?

Tatoosh Range, Mount Rainier National Park

Photographing in Paradise Meadows Mount Rainier

Paradise Meadows Wildflowers Mount RainierParadise Meadows Wildflowers Mount Rainier #73268  Purchase

This post is the second of a two-part article about planning and photographing in Mount Rainier National Park Paradise Meadows. Read part one here.

A trip to photograph in Mount Rainier National Park or any other national park can be a very rewarding experience. It can also be a disappointing exercise in frustration. Good planning and having enough time available to meet your photography goals will increase your chances of success.

Since I’ve already given some tips on trip planning in my previous post, let’s start talking about locations and how best to photograph them. Mount Rainier is a big park with lots of great areas to photograph in. However, for this article, I’m going to focus only on the Paradise Meadows area and a few adjacent locations.

Essential Tip #1:  All of the locations in the Paradise Meadows area provide excellent opportunities for both sunrise and sunset. In summer the sun will rise and set a bit further in the north. There will be slightly more light hitting the glaciers on Mount Rainier at sunrise than there will at sunset. Both times can provide some excellent side-lighting to wildflowers.

Paradise Meadows Skyline Trail Mount Rainier Skyline Trail Mount Rainier #72892 Purchase

But First a Lecture

Mount Rainier National Park receives over 2,000,000 visitors every year, and that number will continue to grow every year. The park service has gone to great lengths and expense (your tax dollars!) to make the meadows accessible for everyone, while also trying to keep them from getting trampled into oblivion.

Please take a minute to read the park’s Meadow Preservation page.

Many trails are paved and roped off, and all have numerous signs to keep people on the trails. Please be thoughtful and considerate to the plants and future visitors, stay on the trails!

It is 100% possible to get great images while staying on the trails. But every time I photograph here I see other photographers going off the trail and trampling the flowers just to get that seemingly better photo. If everyone did that then Paradise Meadows would be nothing more than Paradise Dust Pit.

I wish I didn’t need to say this but here it goes. Do not even think of visiting Paradise Meadows unless you plan on strictly photographing only from established trails and keeping off the meadows. If you can’t do that then you should probably stay home!!

Paradise Meadows Wildflowers Mount RainierParadise Meadows Wildflowers #73347  Purchase

Paradise Meadows Trails and Locations

There are numerous trails in the Paradise Meadows area that give access to all the best photo locations. I like to divide the trails in the area between the west and east halves of the Paradise Meadows area. Both sections have excellent photo opportunities, but the western half has a better-unobstructed view of Mount Rainier. I also feel that the west half often has better groupings of flowers and opportunities for compositions.

Download the Paradise Meadows Hiking brochure and map here.

Essential Tip #2:  Scouting is an essential technique for better photography. Always scout out the best locations in advance by spending the day hiking as many trails as possible. Make notes of the best spots and how long it will take to reach them in the morning and evening golden hours.

Essential Tip #3:  Keep in mind that to reach most of the best flower meadows there is an elevation gain of several hundred feet from the parking area. While the trails aren’t steep or difficult it will take some effort to reach the best spots, especially if you’re racing against time and chasing light.

Essential Tip #4: Photo compositions in the west and east sections of Paradise are sufficiently far enough apart as to exclude photographing in both areas during the same morning or evening golden hour. Stick to one area and come back the next morning or evening for the other.

Tatoosh Range with a mixture of Broadleaf Lupines, and Western Anenomes in the foreground. Mount Rainier National Park, Washington #73159orTatoosh Range Paradise Wildflower Meadows #73159  Purchase

Skyline Trail: This is the main trail that makes a loop through the entire Paradise area. This scenic trail makes an excellent leisurely all-day loop. However, be aware that the higher elevation part of this trail traverses mostly rocky alpine terrain. Nearly all of the best flower meadows are at middle elevations on the western parts of this trail.

There are many great compositions to be had around 5800′ elevation by using the trail network between Skyline and Deadhorse Creek Trails.

Deadhorse Creek, Moraine,  Nisqually Vista Trails: The main attraction for all of these trails are the views of Mount Rainier and the yawning chasm below the Nisqually Glacier. Deadhorse Creek trail connects with the Skyline trail so a loop will offer both glacier views and great wildflower photos.

Golden Gate Trail: This mile-long trail begins on the lower Skyline at Myrtle Falls, and ends at the upper Skyline Trail on Mazama Ridge. There are some great flower groupings all along this trail, especially near Myrtle Falls. Make sure you check out classic compositions of both Edith Creek from the footbridge and Myrtle Falls from the lower overlook.

The downside of the Golden Gate trail is that views of Mount Rainier are partially obscured by Panorama Point Ridge. However, this trail is great for including the Tatoosh Range in compositions instead. There are some wonderful flower groupings on the upper section switchbacks for use in such compositions.

Tatoosh Range and Skyline Trail Paradise Meadows Skyline Trail Mount Rainier Tatoosh Range from Mazama Ridge #73153

Mazama Ridge Paradise Meadows 

Mazama Ridge can be accessed by several different trails. It can be reached via the Skyline Trail from the Paradise Meadows parking area, or from below at Reflection Lakes. Keep in mind that if you are starting from Reflection Lakes you will have a considerable amount of elevation to gain before reaching the best areas.

Due to the nature of the snowpack melting out many of the best wildflower displays on Mazama Ridge often bloom a bit later than elsewhere in Paradise.

Skyline Trail on Mazama Ridge:  Access is either part of the Skyline Loop or from the end of the Golden Gate Trail. I feel the upper part of Mazama Ridge on the Skyline Trail offers the best photo opportunities. This is mainly due to the more open views of the Tatoosh Range.

Lakes Trail:  While there are some good photo ops on this trail they are mostly the upper half. One of the benefits of this trail is that the views of Mount Rainier are set back a bit.

Paradise Glacier Trail: This trail begins on the upper part of Mazama Ridge. For the most part, it travels through fairly barren rocky terrain. But there are some decent flower displays along the first half mile or so. The attraction on this trail is viewing the raw landscape that not too long ago was beneath glaciers.

Some of the best displays of Lewis’s Monkeyflowers are near the junction of the Paradise Glacier and Skyline trails. Here they grow alongside streams thick with bright green mosses. Unfortunately, it’s difficult to include a satisfactory view of Mount Rainier or the Tatoosh Range in photos from this spot.

Mount Rainier and Edith CreekEdith Creek Mount Rainier #3522  Purchase

Myrtle Falls Edith Creek Paradise Meadows

These classic locations are only a half-mile from the Paradise parking area on the Skyline Trail. Both photograph well in morning or evening light with a preference for sunrise.

Be aware that this is one of those locations that can be crowded not only during the day but during golden hour light. This is a very popular spot for photo workshops and wedding photographers. Please be considerate of other photographers, especially those photographing newlyweds.

Myrtle Falls Mount Rainier National ParkMyrtle Falls Mount Rainier #72865  Purchase

Also, use caution at the overlook to Myrtle Falls. It’s a small cliffside viewing area which can be a bit dangerous for you and your gear when surrounded by overzealous visitors. Early in the season dangerous snow bridges and slippery snowpacks can prove fatal, exercise extreme caution or avoid the overlook completely at this time!

Mount Rainier sunrise from Reflection LakeReflection Lakes Mount Rainier #73126  Purchase

Reflection Lakes

The roadside view of Mount Rainier from Reflection Lakes is one of the classic photographic vantage points in the park. One can easily argue it’s one of the most classic views in the entire Pacific Northwest!

To get here just take the road turnoff to Stevens Canyon just below Paradise Meadows, or follow Paradise Valley Road east from the Visitor’s center parking lot.

Essential Tip #5: This is a primarily sunrise location. Like many classic national park photo locations, it attracts hordes of photographers and workshops. Plan on setting up in the best spot at least an hour before sunrise. Bring a headlamp and a thermos of coffee! And of course please heed the signs and help preserve fragile areas by staying out of closed areas.

Landscape photography doesn’t get much easier than at Reflection Lakes. Parking is right alongside the lake so theoretically, you don’t even need to get out of your car! Of course, getting the best photos will involve a bit more than that. It will be to your advantage to scout out the best spots the day before so you won’t be guessing in the dark the next morning.

Sunrise over Mount Rainier seen from Reflection Lake, Rosy Spirea (Spirea splendens) 
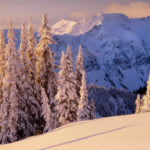
is in the foreground. Mount Rainier National Park Washington #73108orReflection Lakes Mount Rainier #73103  Purchase

I feel the best spots are on the eastern end of the lake where small groups of wildflowers can be used in the foreground. This is also one location that will provide great photos whether you are there during or after wildflower season. On a cold fall morning, there are often thin sheets of ice on the very photogenic lakes.

Essential Tip #6:  Don’t make the mistake of setting up your tripod and photographing only one composition. Pick out the best primary spot and wait to photograph it in the best light, then move on to other compositions.

Bench Lake Mount Rainier National ParkBench Lake Mount Rainier #73143  Purchase

Bench Lake

This is a great sunrise location with wonderful views of Mount Rainier that not many photographers visit. The view of Rainier from Bench Lake shows more of the lower part of the mountain than at Reflection Lake. However, you are limited to a tiny stretch of sand along the lake for compositions.

Bench Lake is an extra doable location after photographing sunrise at Reflection Lake if you still have some nice early morning light to work with. Drive about 1.5 miles east of Reflection Lakes to reach the trailhead to Bench and Snow Lakes. The lake is about 1.25 miles along the trail with some minor ups and downs along the way.

Pinnacle Peak Trail Mount Rainier National ParkPinnacle Peak Trail Mount Rainier #72992  Purchase

Pinnacle Peak

If you have extra time during your trip a hike up to Pinnacle Peak is definitely worth the effort. The trail starts across from Reflection Lakes and is about 1.25 miles in length with about 1400′ of elevation gain. It feels longer than 1.25 miles but the increasingly dramatic views of Mount Rainier keep your mind off the work.

There are several good spots along the trail for photos which include wildflowers or hikers on the switchbacks. Just west of the saddle at the trail’s end there are a few spots to sit and get some pics. If you’re up for it you can continue the steep route to Plummer Peak. For the adventurous photographer continue hiking east on a rough semi-exposed trail to a saddle above Pinnacle Glacier. The views of Mount Rainier from there are wide open.

Essential Tip #7:  Photography from the Pinnacle Peak trail is best in the evening light. Bring water and wear a hat, this trail can be very hot in the afternoon during the summer. Make sure to bring a headlamp for the way down if you’re planning on golden hour photography.

Christine Falls Mount Rainier National ParkChristine Falls #73210  Purchase

Christine and Narada Falls

These two waterfalls are an absolute must photograph when you’re in the area. Both are very easy short walks from the road and both offer perfect compositions from the viewing areas. As with most waterfalls, they are best photographed on an overcast day, or in the early morning or evening when they are in shade.

Essential Tip #8:  Like nearly every location in a national park try to avoid photographing these waterfalls during the crowded busy part of the day. Before 9:00 am or after 5:00 pm is best, then you’ll probably have them all to yourself.

Narada Falls Mount Rainier National ParkNarada Falls #72871  Purchase

Camera Equipment Suggestions 

What camera gear should you bring on a Mount Rainier photography trip? In a nutshell, everything you have. Ok, maybe not everything, especially if you’re a gear junkie with dozens of lenses and camera bodies. 

If you’re using a camera with a full-frame sensor the most useful focal lengths are 14mm-70mm. So basically ultra-wide to very slight telephoto should cover most compositions. The only time I used my telephoto lens was to zoom in on some glacier details.

Basic Essentials:

    • Tripod
    • Wide to ultra-wide lenses
    • Normal range lens
    • Telephoto lens; for landscapes up to 200mm would be good enough. Paradise Meadows isn’t known for wildlife photography so long telephotos aren’t necessary.
    • Polarizing filter
    • Graduated Neutral Density Filters;  I still use these in the field in certain circumstances instead of creating the effect in post-processing. Although they are not always the best option.
    • Remote shutter release
    • Bug Spray!

Essential Tip #9:  Brush up on your focus stacking techniques. Since you’ll probably be photographing wide-angle compositions with wildflowers in the foreground and Mount Rainier in the background you’ll need to use methods that increase your depth of field.

Essential Tip #10: Mosquitoes, gnats, and other flying insects will be especially bothersome during times around sunrise and sunset. The same time when you will need to concentrate on your photography. Bring insect repellant or wear netting.

Essential Tip #11:   BE CREATIVE! Use your own eyes and mind. Just because 20 other photographers are photographing the exact same scene, in the exact same position, with the exact same gear and settings, doesn’t mean that you have to follow suit. Photographing something uniquely and creatively could be as simple as just turning around to see what’s behind you!

Mount Rainier sunrise from Reflection LakeReflection Lake Sunrise Mount Rainier #73082  Purchase

In Conclusion

Combining all the information and tips in this post and Paradise Meadows Mount Rainier Photography Trip Planning, you now should have everything you need to know to have a productive, safe, and enjoyable trip to Paradise Meadows. Now get out there and have fun!

Thanks for reading, feel free to share this post with your friends and colleagues!

Want to learn more, or have a professional photographer guide you in the field? Then take your Creative Photography to the next level with  Private Instruction and Guided Photo Tours.

All photos appearing in Photographing in Paradise Meadows Mount Rainier are available for Commercial Licensing and Fine Art Prints. Click on any image to purchase, or contact me for more info!

Mount Rainier, Paradise Meadows Wildflowers

Paradise Meadows Mount Rainier Photography Trip Planning

Mount Rainier, Paradise Meadows WildflowersParadise Meadows Mount Rainier #3485  Purchase

This post is part one of a two-part article about planning and photographing in Mount Rainier National Park Paradise Meadows. Jump to part two here.

One of the most popular locations for photographing wildflowers in the Pacific Northwest is Paradise Meadows Mount Rainier National Park. Few mountain locations have such an abundant display of wildflowers along with easy access to them. But at Mount Rainer, there are more than just subalpine meadows bursting with color. The views of the meadows include the hulking mass of a 14,411′ volcano and some of the largest active glaciers in the lower 48 states.

What is even more impressive is that there are numerous meadows of wildflowers around the entire circumference of the mountain. Some of them, like those at Paradise and Sunrise, are just a short walk on paved trails from the parking lot. While other locations like Spray Park are only accessible as longer day hikes or overnight backpacking excursions.

The most extensive and luxurious wildflower displays by far are found in the Paradise Meadows area. It is at this and adjacent locations that I’ll be talking about in this post.

Mount Rainier, Paradise Meadows WildflowersParadise Meadows Mount Rainier #3499  Purchase

But First a Lecture

Mount Rainier National Park receives over 2,000,000 visitors every year, and that number will continue to grow every year. The park service has gone to great lengths and expense (your tax dollars!) to make the meadows accessible for everyone, while also trying to keep them from getting trampled into oblivion.

Please take a minute to read the park’s Meadow Preservation page.

Many trails are paved and roped off, and all have numerous signs requesting people to stay on the trails. Please be thoughtful and considerate to the plants and future visitors, stay on the trails!

Skyline Trail Mount Rainier National ParkSkyline Trail Mount Rainier #72982

It is absolutely 100% possible to get great images while staying on the trails. But every time I photograph here I see other photographers going off the trail and trampling the flowers just to get that seemingly better photo. If everyone did that then Paradise Meadows would be nothing more than Paradise Dust Pit.

I wish I didn’t need to say this but here it goes. Do not even think of visiting Paradise Meadows unless you plan on strictly photographing only from established trails and keeping off the meadows. If you can’t do that then you should probably stay home!!

Paradise Wildflower Meadows Mount RainierParadise Meadows Mount Rainier #73244  Purchase

Planning A Paradise Meadows Photography Trip

You can spend as little as a day in the park and come away with a few good photos. But if your goal is portfolio quality images you’ll need to schedule more time. So I would recommend at least three days. That way you can explore all the trails and photo opportunities in the area.

Ideally a better trip length might be 5-7 days. With a week available you’ll be able to scout out all the best locations and photograph them in multiple lighting events. On my last trip to Mount Rainier, I photographed every day for a week but had only one morning and one evening of outstanding light. Because of this, I stayed in the Paradise area the entire trip to make sure I got the images I wanted.

Essential Tip #1: Always give yourself enough time and be flexible with your itinerary.

Tatoosh Range in winter, Mount Rainier National Park
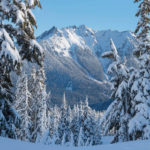
Tatoosh Range in Winter #5019  

Seasons in Paradise Meadows Mount Rainier

The road to Paradise Meadows and the parking area are open year-round. Although summer sees the most visitors, the winter season which stretches from November until May is also very popular. During those months Paradise is a magnet for backcountry skiers and climbers training for Alaskan or Himalayan expeditions.

For landscape and nature photographers late July to mid-August is the best time to plan a trip. However, timing varies every year due to the amount of snowpack.  But generally, you can usually be sure of hitting the peak wildflower bloom in the first weeks of August.

Keep in mind that all species of flowers don’t bloom at the same time. Glacier and Avalanche Lilies are the first to bloom as soon as the snow melts away. Shortly after Lupines, Sitka Valerian, Paintbrush, Pink  Mountain Heather, and Western Anemone dominate the scene. After the Lupines begin to fade Asters and Arnica take over the show.

Essential Tip #2: Check out the Park Service’s Wildflower Status page to see what is currently in bloom.

One of my favorite wildflowers is Lewis’s Monkeyflower. These brilliant purple flowers grow in dense clusters along streams and marshy areas in the subalpine. You can often see them among mats of vibrant green moss. Note that Lewis’s Monkeyflower is often in full bloom later in the season.

Mount Rainier sunrise from Reflection LakeReflection Lakes Sunrise #73114  Purchase

Guided Workshop Or Solo Trip

At some point, you’ll need to decide whether to go with an established workshop/photo tour or do the trip on your own. There are many advantages and disadvantages to either option.

Photo Tour/Workshop Advantages:
-Led by a seasoned professional photographer with intimate knowledge of the park and the opportunity to learn new techniques from a pro.
-Meals, lodging, and transportation are usually included, someone else does the driving for you.
-Being part of a group dynamic can be creatively beneficial.

Photo Tour/Workshop Disadvantages:
-Limited freedom to photograph where and when you want.
-Inability to postpone trips or change schedules due to weather considerations.
-Daily schedules can be very rigid, there may not be any flexibility to stay longer in one location.
-Travel times and distances from lodging to locations can be great, making for long days.
-Cost can be prohibitive

Solo Photo Tour Advantages:
-Unlimited freedom, photograph where you want when you want.
-Ability to postpone trips or change schedules due to weather considerations.
-Ability to lodge or camp where you choose, cutting down on travel time to locations.
-Huge cost savings.

Solo Photo Tour Disadvantages:
-Extra research is needed to find the best locations.
-Finding lodging on the fly daily can be difficult.
-Lack of assistance and input from a leader or group members.
-No one to share ideas or experiences with.

During my entire career as a professional photographer, I’ve traveled mostly solo. I love the freedom and flexibility associated with this mode of travel. And I know for a fact that I’ve been able to get better photos because of it. But of course, this is just my preference and it certainly won’t work for everyone. It’s up to you to decide.

Paradise Road Mount Rainier National ParkRoad to Paradise Mount Rainier #72878  

Trip Logistics Paradise Meadows Mount Rainier

Location, location, location. It’s all about location, and Mount Rainier National Park is no different. Generally, you’ll have time to photograph only one location during the morning or evening golden hour. By the time you can reach the next spot, the light will most likely have faded until the evening or the next morning. And remember this isn’t a race or contest, slow down and appreciate where you are!

Keep in mind that it is about an 18-mile drive from the Nisqually entrance to Paradise Meadows. Since it is a slow winding mountain road allows about an hour for the drive. The closer you stay to your subject matter the better chance you have of being in the right place at the right time. And you will be more relaxed and focused when you get there.

Essential Tip #3:  Set your alarm and get used to rising very early. Absolutely nothing is worse than planning on being at a certain spot before sunrise than being late because of hitting the snooze alarm one last time and then having a long drive ahead. Stopped for speeding, or worse, hitting a moose in the dark during your haste? Ughh!

Sunset over Paradise Mount Rainier National ParkParadise Sunset Mount Rainier #73203  Purchase

Lodging and Services

No matter where you stay, be it in a national park, a forest service campground, or a motel or resort, be prepared to make reservations well in advance of your trip, if possible. Even in the shoulder seasons vacancies in lodging and campgrounds can be difficult to find. Popular campgrounds will fill by early morning. Research and plan. It’s no fun driving around in the dark after a long day trying to find a place to sleep.

Essential Tip #4: Plan and reserve accommodations far in advance.

Lodging: There are several options for lodging when photographing in the Paradise Meadows area. If you can afford it the most convenient option would be to stay at the historic Paradise Inn. Situated right at Paradise all the best locations are right outside your door! For this option, you’ll need to book well in advance. There is also the National Park Inn located lower down the mountain in Longmire.

Between the town of Ashford and the Nisqually entrance, there are several options for cabins and motels. The best and closest option for camping is Cougar Rock, about a half-hour drive from Paradise Meadows. Reservations are recommended but you can usually get a site if you arrive before 9:00 am.  

Services: Gas and groceries are limited to Ashford which has one gas station a couple of small convenience-type stores, and a small laundromat. In the park, Longmire has a small general store with limited supplies. So it is best to plan ahead and arrive with all the food you need for your stay.

Cell Signal:  While in the park cell service is limited to the Paradise area, where there is a pretty strong signal. Otherwise, you’ll have to travel back down to Ashford.

Paradise wildflower meadows Mount Rainier National ParkPink Heather Mount Rainier #72905  

Fees Passes

The entrance fee to Mount Rainier National Park as of this date is $30 for a private vehicle and passengers and is good for seven days. An annual pass exclusive to Mount Rainier National Park is $55.

Consider purchasing an America The Beautiful annual pass if you photograph in many national parks and federal recreation areas throughout the year. This pass costs $80 and is good for National Parks, BLM lands, National Forests, and more.

Thanks for reading, please feel free to share this post with your friends and colleagues!

Next up, is part two of this article, Photographing in Paradise Meadows Mount Rainier.

Want to learn more, or have a professional photographer guide you in the field? Then take your Creative Photography to the next level with  Private Instruction and Guided Photo Tours.

All photos appearing in Photographing Paradise Meadows Mount Rainier are available for Commercial Licensing and Fine Art Prints. Click on any image to purchase, or contact me for more info!

Paradise Meadows Mount Rainier Photography Trip Planning

Mount Shuksan from Baker Lake North Cascades

North Cascades Photography Workshop

North Cascades Photography Workshop

Mount Shuksan from Baker Lake North CascadesMount Shuksan and Baker Lake #53550

Join me for a two-day workshop on creative visualization in the North Cascades.  Hosted by the North Cascades Institute, the Pacific Northwest’s premier organization for environmental learning. This will be a hybrid workshop, with the first part being a full day in the field. The second part will be an online Zoom session where we will discuss techniques of photo editing and processing.

The field segment will be a full day of photographing in the beautiful Old Growth forests along Baker Lake in the North Cascades. The lake sits below the towering summits of Mount Baker and Mount Shuksan. Along the way, we will pass numerous streams flowing through a cool and fragrant forest of giant firs and cedars. Along with an understory lush with ferns and wildflowers there will be plenty of subject matter to work with.

Hidden Creek. Baker Lake Trail, North Cascades WashingtonHidden Creek North Cascades #65030  Purchase

During our time in the field, we will discuss and learn composition techniques. We will also explore focus stacking, exposure stacking, macro photography, and more. Above all, we will learn to develop and express personal visions of the surrounding environment. In the online Zoom session, we will discuss and learn various editing and processing techniques to help convey creative your experience.

Although this workshop touches on some basic technical aspects of photography the focus will be on creativity and visualization. Participants should possess a working knowledge of their cameras. Participants should also have a basic understanding of image editing apps.

Due to pandemic restrictions, the field portion will be limited to eight participants.


Western Wake-robin (Trillium ovatum)Trillium #53779  Purchase

Suggested Photography Equipment

  • DSLR  is preferred but any camera will be acceptable
  • Wide-angle to short telephoto lens
  • Polarizing filter
  • Tripod
  • Remote shutter release

Sunrise over Mount Baker (elevation 10,778 feet (3,285 m) 
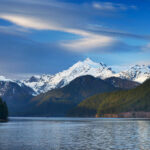
and Baker Lake, North Cascades WashingtonMount Baker from Baker Lake  #53562  Purchase

North Cascades Photography Workshop

Nooksack Ridge in winter North Caascades Washington

Essential Winter Photography Tips

Essential Winter Photography Tips

Nooksack Ridge in winter North Cascades Washington Winter Photography Essential TipsHeather Meadows North Cascades #64748  Purchase

Note: This post is a bit longer than some of my others since there are a lot of winter photography tips to share on the topic.

A successful winter photography trip is all about planning and timing, especially if you’re photographing landscapes. As I outlined in my previous post, winter photography presents some unique challenges to the photographer, but if you can get past them a whole new world rich with rewards will be open to you. Few experiences can match getting out of your tent at dawn after a storm has cleared to photograph a trackless pristine winter scene in perfect light!

Winter Photography Tips, Front Country or Backcountry:

When planning a winter photography trip your location options are the same as the rest of the year, front-country or backcountry. However, in winter a backcountry photography location involves more risk and preparation.

Icefields Parkway in Jasper National Park Winter Photography Essential TipsIcefields Parkway in Jasper National Park #43396  Purchase

Frontcountry locations can be accessed in several different ways. It may be as easy as driving up to a classic viewpoint along a road or in a national or state park. But keep in mind many of those locations may be closed or on unplowed roads in winter.

Utilizing ski area chairlifts is a great method for accessing winter landscapes. They can get you higher up to views usually accessible by hiking trails in summer. They’re also a good way to shave off some miles and elevation when starting a backcountry trip. Some ski areas offer a discounted one-trip-only lift ticket. But if you’re a skier a full-day ticket is the way to go. It will enable you to do some early morning photography, have fun skiing all day, and then make one last trip up for evening light. Getting on and off a chair lift can be tricky though when you have a pack full of camera gear.

North Cascades winter backcountry camp Winter Photography Essential TipsNorth Cascades Winter Backcountry Camp  #47098  Purchase

Backcountry locations involve more planning, more gear to carry, and efficient means of travel. Don’t even consider getting into a winter backcountry location by just walking in snow boots. Nothing is more exhausting than trudging through hip-deep snow! Snowshoes, skis, or split-board snowboards are the best options.

All the gear for a full-day backcountry photography trip can be reasonably carried in a mid-size backpack. If you’re planning an overnight trip expect to carry at least 25% more weight on your back. But if that seems doable don’t forget that snowshoes or skis can add up to an additional 5-7 pounds on each foot Any way you look at it you’re in for a good workout!

A well-timed overnight backcountry trip will put you in an enviable position. Photographing a pristine landscape at sunrise just after a fresh snowfall is a magical experience, making it well worth all the effort!

*Essential Tip: To photograph pristine landscapes arrive as early as possible when photographing near ski areas, or other popular locations. After a fresh snowfall skiers will flock to the slopes in hordes. Often within an hour after sunrise slopes will be completely tracked out. The popularity of backcountry skiing has exploded over the years. So even relatively remote areas can be tracked out quickly.

Also, be aware of reckless drivers on roads leading to ski areas. Many skiers throw caution to the wind when it comes to getting first lines.

Wells Grey Provincial Park in winter Winter Photography Trip PlanningWells Grey Provincial Park British Columbia #3683  Purchase

Light:

In winter the sun of course is in a lower latitude. And for photographers that means more opportunities for the golden light and side lighting. Also, since the days are shorter there’s a lot less waiting around in the cold for good light. The golden hour lasts longer in the morning and starts earlier in the afternoon. But even in the late morning and early afternoon, the angle of the sun can still present wonderful photographic opportunities.

As a bonus, you don’t need to get up as early in the morning. But if you’re camping out you’re in for nearly fourteen hours of darkness. You’ll also have less travel time available, requiring some locations to be an overnight trip. Of course, waiting until late winter or early spring means longer days and warmer temperatures. However, during the transitions of seasons, the weather will also be more volatile, which could also provide opportunities for dramatic light.

*Essential Tip: Set your camera meter on manual. Camera meters are set for a base exposure of neutral gray. All that white snow will trick your camera into exposing the scene too dark. There are numerous methods of compensating for this, but for me, the easiest is to set the camera on manual and overexpose +1 stop. Also, always check your exposure on your camera’s histogram view, and adjust your exposure accordingly.

Weather:

Ideally, you’ll want to be on location just as a storm cycle concludes, leaving the trees* and landscape covered in fresh snow, with the remnant clouds bathed in glowing morning or evening light.

*Essential Tip: Trees that are free of snow tend to lose detail and become silhouettes against a snowy white backdrop. Try to get on location before the snow melts off tree branches.

Your first challenge is to become a bit of an amateur meteorologist.  You’ll need to regularly keep track weather of patterns and trends for your desired destination. Make sure you use several sources, such as NOAA, Weather Network, AccuWeather, Mountain Weather Forecasts, etc.

Observe storm patterns and satellite images on weather sites. Watch the direction they come from and where and how long they last. Also, take note of temperature fluctuations before during, and after a storm. Winter storms often start warm and wet, followed by colder dryer conditions. Look at the bigger picture and find out the seasonal patterns of weather. Let’s take a look at why this is important.

Ice encased trees Winter Photography Trip PlanningSnow-encased trees North Cascades  #33243  Purchase

Regional Weather and Snow

 
Pacific Northwest storms often dump huge quantities of heavy wet snow in the mountains. Quickly fluctuating temperatures can change the snow to rain in an instant, or vice versa. This is especially true in November and December, the stormiest months of the year. However, January and February have cooler and more consistent temperatures, with more calm periods between storms. Making this a better time to visit locations such as Mount Rainier or Mount Baker. In March the storms ramp up again with more variable temps.
 
Rocky Mountain states and provinces have a completely different scenario. The big difference is temperature. This far inland it’s much colder and dryer. The snowfall amounts will be a lot less, even in major storms. And even more importantly the snow will be dryer and less likely to accumulate on trees. So your window of opportunity to photograph that fresh snowfall may be much smaller.
 
In the Rockies, the cold dry conditions are a great benefit for photographing other winter subjects, such as ice. The consistently colder temperatures freeze waterfalls lakes and rivers, something that is quite rare in the coastal ranges. 

So make sure you educate yourself about the various conditions in different areas, it’ll help get you there at the right time and decide where to go for different subject matter, not to mention when it’s time to hightail it out to the safety of a motel.

Ski Touring Coast Range B.C.Ski Touring Coast Range British Columbia  #50345  Purchase

Route Finding:

Well-groomed summer trails to your favorite mountain vista will be under several feet of snow in the winter. There won’t be any trail markers visible, leaving it up to you to find the route.

White-out conditions are especially dangerous. There will be no visible distinction between sky and snow, and it’s very easy to get turned around in a matter of seconds. When traveling on skis in these conditions there can often be a strange and frightening sensation of sliding backward when you’re moving forwards! Even in good weather, a familiar route in winter will look much different than in summer. I’ve been up to Artist Point by Mount Baker dozens of times in the summer. But it always amazes me how unfamiliar the route looks in winter.

Check with park rangers for special winter routes and advice, or go online to local winter recreation forums for advice. For example, due to avalanche dangers, the Paradise area at Mount Rainier has different winter routes specified by the park service.

I’m a firm believer in using a map and route-finding skills, and not relying on GPS, cell phones, and other electronic gadgets. In winter especially you must develop a new set of skills and common sense to get around safely. It is unbelievably easy for things to go wrong in winter. Dead batteries, or losing your phone or GPS in the snow mean disaster.

Abraham Lake AlbertaAbraham Lake Alberta  #43646  Purchase

Winter Photography Tips, Safety:

Avalanches are the biggest hazard on a winter photography trip in the mountains. Never travel alone in any area that is susceptible to avalanches! If you are caught in even a small slide your chances of getting out alive are very slim. However, the science of learning to identify potential hazards is too complex to explain here. 

Visit your local outdoor recreation store to get information on avalanche awareness and safe winter travel in your area. Most likely they will also offer avalanche safety courses or direct you to an organization that does. A good short course will go a long way in keeping you alive and safe. Plus you’ll have fun and probably meet some future travel partners.

Afterward, and before heading into the backcountry, you’ll need to invest in the tools needed for safe travel in avalanche-prone areas. Namely an avalanche beacon*, avalanche probe, and shovel. Expect to pay anywhere from $350-$450 for all three items. Most outdoor retailers sell these items both separately and in a package, which offers a bit of saving on cost.

*Do Not purchase a used beacon that was manufactured before 1990! These older beacons use a different frequency and are not compatible with newer models.

Also, exercise extreme caution on lakes or streams. A snow-covered surface may hide dangerously thin ice.

Frostbite and Hypothermia are the next biggest hazards of photographing in winter. Landscape and nature photography practically requires sitting around in one place waiting for the right lighting conditions. This alone is an invitation to hypothermia. But remember, hypothermia is not limited to winter conditions. It can occur in temperatures of 50º and even higher in windy wet conditions.

When you’re working up a sweat hiking or skiing it is very easy to quickly lose heat and become chilled when resting. Even on a sunny day. Unless you quickly put on dry clothes or an insulating layer hypothermia can quickly set in. Learn what the signs are and act quickly to get warm.

Frostbite or frostnip are serious concerns anytime the temperature gets below freezing. Fingers and toes are most susceptible. Tight-fitting boots and gloves are the biggest causes since they hinder crucial circulation. Tingling numbness and loss of feeling are danger signs.

To prevent both hypothermia and frostbite it is essential to stay dry and wear properly fitting clothes. Keep your core body well insulated and warm and your extremities will fare better.

Ski lift Mount Baker Ski Area Winter Photography Trip PlanningMount Baker Ski Area  #53513  Purchase

Dress for Comfort and Safety:

Always dress in layers. to stay warm and dry you’ll constantly be shedding layers when active, and adding layers when sedentary.

Baselayers are the foundation. You wear it all day and it keeps body heat in and wicks sweat and moisture away. Merino wool is preferred over synthetics. It stays fresher longer and retains heat better than synthetics.

Midweight layers can be a synthetic sweater or vest, or a lightweight down sweater. Keep in mind that when you work up a sweat down will absorb that moisture, causing it to lose its insulation properties. For that reason, synthetic is preferred for this layer.

Insulated jacket. This is where you’ll want to invest in a good down product. When taking a break or standing around waiting for the light you’ll lose body heat quickly. A nice puffy down jacket or parka will trap that heat and keep you warm and cozy.

Shell Jacket and Pants. These can be either hardshell or softshell, but hard shells are preferred for stormy conditions. Just make sure they are well made and are both water and windproof. A lightweight article without insulation is the best and most versatile. Look for lots of easily accessed pockets and waterproof zippers.

Gloves and hats. I always carry two pairs, a fleece liner glove, and an insulated ski gauntlet glove with leather palms and fingers. Mittens can be better for warmth but they’re difficult for performing minor tasks like buckling and pulling zippers. A good beanie hat is essential to keep your head warm. Use a lightweight version or headband for uphill exertion and a heavier one for sitting around.

Winter dawn over Crater Lake and Wizard IslandWinter dawn, Crater Lake National Park #3180  Purchase

Winter Photography Tips, Gear:

Keep it simple and organized: Try to keep your gear to a minimum and keep it organized. One of my absolute biggest frustrations with shooting in winter is dealing with buckles, straps, snaps, and zippers. Every item you’re wearing or carrying seems to latch and get tangled onto these fasteners. Trying to cope with the problem is compounded by the necessity of wearing gloves. Try and choose gear that has a minimum of these things and keep important items in easily accessible pockets or compartments.

Keep it out of the snow: When photographing try and lay your pack, spare jacket, or another large item on the snow, then place needed articles on it to keep them dry and in view. It is incredibly easy to drop a filter or lens cap in the snow right in front of your feet and never find it again!

Keep it dry: Bring along several good microfiber lens wipes and or large cotton bandannas. No matter how hard you try things will get wet or snowy and having an absorbent fabric on hand is indispensable.

Keep Batteries Warm: This should go without saying but batteries will quickly lose power in cold temperatures. Modern lithium-ion batteries hold a charge longer and are better than traditional AA or AAA types. Regardless keep them warm in a pocket close to your body.

Keep your camera cold:  Needless to say, your gear will be in cold temperatures for most of the day. Bringing a camera in and out of a car, a warming hut, or a lodge will quickly warm it up, causing harmful condensation to form on the lens and camera body.  If this happens, always wipe your gear dry immediately. Better yet, protect them in plastic ziplock bags before bringing them inside.

Tripods:  Using a tripod in deep snow can be challenging. Manfrotto makes tripod snowshoes that will attach to the legs of most tripods. I have a pair of these but have never used them simply because they’re a pain to attach and don’t work well in all the various snow conditions I encounter.

When setting up my tripod I cautiously spread the legs only about halfway or less and sink them into the snow almost monopod style. Since this position isn’t very stable I’ll use a remote to trip the shutter. Spreading the legs out increases your chance of bending, jamming, or breaking them. Be warned that this may not be the best technique but it works for me.

Handle with care: The lower the temperature goes the more susceptible everything is to breakage. Plastic items are the biggest concern, but metal can also become brittle. Never overtighten anything! Not only is it an invitation to breaking but it will be more difficult to unfasten when wearing gloves.

Filters: Polarizing filters should be used judiciously. It’s very easy to darken a blue sky too much against a white landscape. And just like using them throughout the rest of the year, be careful of vignetting on a wide-angle lens.

If you regularly bring graduated neutral density filters you’ll probably use them in a reverse manner in winter. Meaning the land will need to be darkened instead of the sky. I rarely find a need for these filters in winter and never take their added weight into the backcountry.

Sawtooth Mountains in winter, Idaho Winter Photography Essential TipsSawtooth Mountains Idaho #6211  Purchase

Helpful links for Winter Photography

For more Winter Photography Tips check out :
Gearing Up For Winter Photography

Ever wonder what it’s like photographing landscapes and nature for a living? Check out my blog post:
What is it like to be a Professional Landscape Photographer?

If you enjoyed reading Winter Photography Essential Tips please share it with your friends and family.

Want to learn more? Take your Creative Photography to the next level with  Private Instruction and Guided Photo Tours.

All photos appearing in Winter Photography Essential Tips are available for Commercial Licensing and Fine Art Prints. Click on any image to purchase, or contact me for more info!

Winter Photography Tips
Trophy Mountains, Wells Grey Provincial Park British Columbia

Gearing up for Winter Photography

Gearing up for Winter Photography

Trophy Mountains, Wells Grey Provincial Park British Columbia Winter PhotographyTrophy Mountains British Columbia  #3962  Purchase

With fall photography wrapping up most of us are beginning to dream of plans for next year’s photography trips. But what about the next several months? There are plenty of photography opportunities and subjects during the winter months too. But I’m not talking about heading down to the Southwest for desert photography. I’m talking about the cold snowy areas of National, State, and Provincial Parks, many of which are nearly deserted in the winter months.

But before going into tips and techniques of actually photographing in winter let’s talk about how to stay safe and comfortable.

Winter photography is definitely more challenging than photographing in warm summer weather. However, with a little preparation and the proper gear, it can be safe, comfortable, and extremely rewarding. In this post, I’m going to outline some tips on gear, safety, and getting around in winter.

All the various items of winter clothing and gear are generally pretty pricey, but you need to get the best you can afford. The key here is to not skimp on quality. Some items that perform great in summer easily break or break down in cold temperatures. In particular, gas canister stoves are nearly useless in cold temperatures.

Bow Valley in winter, Banff National Park Winter PhotographyBow Valley Banff National Park #43869  Purchase

Winter Photography Clothing:

  • The rule in outdoor safety is cotton kills. Cotton has no insulation properties, leaving you vulnerable to hypothermia. And when cotton is wet it is nearly impossible to dry off in cold temperatures.
  • Merino Wool is your best option for base layers. Unlike traditional wool, Merino wool is softer and isn’t itchy. It’s warm, and comfortable, and stays fresher smelling than synthetics after a few days of wear.
  • Waterproof shell jacket and pants. Look for features such as built-in gaiters, suspenders, articulated knees, hood, and deep pockets with zippers.
  • Down jacket or parka. Absolutely nothing beats down for insulation. Keep it dry and it’ll be your best friend. But get it wet and it’s worse than cotton for insulation. I wear my down jacket when standing around camp or when waiting for the light. However, it’s too warm for heavy exertion, when you risk getting it wet from perspiration.
  • Insulated high-top snow boots. You’ll be trudging through deep snow and standing around a lot. Make sure they fit well. Tight-fitting footwear equals cold feet.
  • Two pairs of gloves or mittens. I have insulated ski gloves with leather palms and fingers and a thinner set of synthetic gloves for better dexterity when working.
  • Hat, sunglasses, and or ski goggles. In addition to the hood on your jacket, it’s wise to bring along a wool or fleece beanie. Also, a good full-face balaclava is essential when it gets really cold and windy. Goggles are great during windier conditions, they provide better visibility and help keep your face warm.
Ski Touring Manning Provincial Park British ColumbiaSki Touring Manning Provincial Park B.C.  #43980  Purchase

Getting Around:

Unless you plan on photographing from your vehicle or on well-packed trails, you’ll need an efficient way to get around in deep snow. How you do that will depend on your goals and location. If you’re photographing in the mountains you’re most likely going to encounter deep snow of varying consistency. Here in the Pacific Northwest, the snow is heavy, wet, and often over 10′ deep. In the Rockies, it tends to be very dry, powdery, and deep too. Regardless of which location it’s no fun post-holing through deep snow in just boots.

  • Snowshoes are a great method for beginners to travel through the snow in a great variety of conditions. They don’t require special skills or boots and are relatively inexpensive. However, don’t assume that you’ll be floating easily on top of the snow. Unless you’re on a packed trail you’ll be sinking in the snow to some degree, and working up a sweat. If you’re hiking through deep, wet, and heavy fresh snow they’re almost as exhausting as post-holing.
  • Backcountry, Alpine Touring (Randonee), Telemark skis, and Split-Board Snowboards. These are, in my experience and personal opinion, the best and most enjoyable ways to access photo subjects in deep mountain snow. You’ll get around easier and faster, and with much better flotation, even going uphill in steep terrain. Plus you’ll have a blast gliding back to your vehicle. The big downsides to these options are the gear can be expensive, and all of them have a much higher learning curve than snowshoes.
  • Cross-country skis are an option only if you’re on a groomed trail or have lots of experience. These skinny skis are generally too narrow for deep untracked snow and are nearly useless for going uphill. And they don’t turn very well on the downhill.
Backcountry skiers North Cascades WashingtonBackcountry Skiers North Cascades #56540  Purchase

Winter Photography Camera Gear Considerations:

In winter you must, of course, care for your camera gear to a greater degree. It’s quite a challenge to stay dry and keep snow off of your gear.

  • A good backpack-style case is essential If you’re going out for more than a few minutes. A good quality backcountry ski pack is a wise investment. Most traditional camera backpacks don’t have enough room for extra clothes, water, snacks, and other essential items necessary for winter travel.

For day trips I suggest finding a quality pack with around 2000-3000 cubic inches of storage. Dedicated ski packs have the advantage of being designed for winter backcountry travel, with room for essential safety equipment, such as shovels and avalanche probes. They are generally more waterproof and have features that can be accessed with gloved hands.

Another good idea is a camera case with a chest harness. This will give you quick access to your camera when snowshoeing or skiing. And it will keep you from constantly unloading your main pack in the snow whenever you come across a subject.

  • Batteries. Always bring extras and have them fully charged before heading out. Today lithium-ion is far superior and more reliable than standard AA batteries. But they are not immune to cold conditions, keep them warm in your jacket if you can.
      • Microfiber cloths and towels. The Hitchhikers Guide to the Universe states “A  towel is about the most massively useful thing an interstellar hitchhiker can have…” This is also true for winter photography. Despite your best efforts, you will constantly be wiping snow and moisture off your gear. Not to mention the constant fogging lens, filters, and camera bodies will get as you handle them. At least one microfiber cloth is essential, but take three for good measure.

Backcountry Safety warning sign Mount Baker Ski AreaBackcountry Safety Warning Mt. Baker Ski Area #56529  Purchase

Safety Considerations:

There are plenty of risks to consider when photographing in a winter environment.  Among them are traveling in avalanche terrain, hypothermia, frostbite, thin ice on lakes and streams, and getting your vehicle stuck. Nearly all of them can be avoided by careful planting, a good amount of caution, and common sense. Listed below are a few basic items you should never leave home without.

  • A Backcountry style snow shovel is a must. They’re strong, lightweight, and great for a variety of uses. Its main safety purpose is digging out an avalanche victim. But they are also useful for digging out your car after a storm and making a seat or shelter in the snow.
  • Avalanche transceivers and probes are essential if you’re planning on traveling into the backcountry through questionable terrain. However, these items are of absolutely no use if you are not trained in using them.  Always travel with companions and make sure everyone has avalanche rescue and awareness training!
  • Tire chains or other traction devices for your vehicle. Never leave home without these. Conditions can change rapidly throughout the day, and a bare dry road in the morning can have inches or feet of snow on them in the afternoon. Most mountain highways require them during the winter months anyway.
  • Jumper cables and or a portable jump starter are also a must. Imagine charging up camera batteries, a smartphone, and or a laptop while sitting in your car waiting for the snow to stop, only to find out your car battery is dead. Not a good feeling!
  • Gas camping stove and extra food. After a day in the snow and cold, it’s nice to have a hot drink. It can also be a lifesaver if you’re cold and on the verge of hypothermia. I always carry a large propane tank in my truck along with a two-burner camp stove. To keep it going in cold weather I need to replace the regulator on the stove every year or so. For the backcountry, I always carry a white gas MSR XGK. Unlike today’s popular gas canister stoves, this stove performs flawlessly in the coldest conditions.
  • Extra dry clothes and a sleeping bag. If you worked up a sweat, or all your clothes are wet you’ll appreciate changing into dry clothes back at the car. A sleeping bag is essential if a surprise storm prevents you from driving home.

North Cascades Highway closure Winter PhotographyNorth Cascades Highway in winter #56605  Purchase

Coming up next

For even more information on planning an outing, day trips vs. overnight backcountry trips, weather, and other considerations check out:
Essential Winter Photography Tips

If you enjoyed reading Gearing up for Winter Photography please share it with your friends and family.

Ever wonder what it’s like photographing landscapes and nature for a living? Check out my blog post:
What is it like to be a Professional Landscape Photographer?

All photos appearing in Gearing Up for Winter Photography are available for Commercial Licensing and Fine Art Prints. Click on any image to purchase, or contact me for more info!

Hannegan Peak backcountry camp North Cascades

Backpacking Photography Tips

Backpacking Photography Tips

Hannegan Peak backcountry camp North Cascades Backpacking Photography TipsMount Baker Wilderness North Cascades #54316r  Purchase

Photography has always been an essential element of vacations. Since the first portable roll film camera was introduced people have been taking pictures of their travels. And backpacking trips into wilderness areas are certainly no exception. In this post, I’ll be offering some backpacking photography tips to help make your trip a success.

My previous post, Backpacking Photography Gear Tips, went into some of the details of choosing the proper photography and backpacking equipment. This time I’ll give tips on photography while backpacking on the trail.

For the purpose of this post, I’ll focus on some basic tips for working in the field which can help to free your creativity.

Mount Robson Canadian Rockies Backpacking Photography TipsMount Robson British Columbia  #54646  Purchase

Set a Goal

Setting a goal for yourself can vastly help in making better photographs. These goals can vary depending on a number of factors, such as:

  • Location
  • Season
  • Weather
  • Subject matter
  • Time available
  • Physical condition

On a backpacking trip you may need to place a limit on and be flexible with your goals. For example, if your goal is action/adventure photography your opportunities for landscape or nature photography will be limited. Or if your goal is to photograph dramatic landscapes but the weather is consistently gray,  consider changing your goal to nature details and or abstracts.

Backpacker Wind River Range, Wyoming Backpacking Photography TipsBackpacking in the Wind River Range #66330  Purchase

Know Your Limits

Remember that your pack will most likely be fairly heavy, and will determine how far and fast you can travel. Don’t push yourself beyond your limit. Take it easy and break your hiking distances into manageable lengths. If you arrive at camp physically exhausted you won’t have much energy left to making good photographs. Unless the perfect image is right in front of your tent you’ll need to be on the move until after sunset.

Carefully research your trip in advance. Check out trip reports and maps, and pay particular attention to elevation differences from point to point. You may think that you can easily hike 15 miles in a day. However, that distance will be considerably less when you throw in 3000′-4000′ elevation gain while carrying a full pack.

Also, know your location. Backpacking in Wyoming’s Wind River Range is vastly different from backpacking in the North Cascades. In the Winds, you gain elevation gradually with many ups and downs. In the North Cascades, large amounts of elevation are gained either by endless switchbacks or straight-up endurance tests.

Glacier Peak Image Lake North CascadesGlacier Peak and Image Lake North Cascades #58239  Purchase

Know Your Subject Matter

This may be the most important tip I have to offer.

The best portrait photographers will always tell you this. Being keenly aware of, and bringing out the nuances in someone’s personality is the key to great portrait photography. This is also true for other subject matter, including landscape and nature.

One of the best ways of accomplishing this is to just sit and observe, be meditative. Consider the current catchphrase Light And Fast. Going light is good, but why fast, what’s the rush? Isn’t wilderness something to be savored? Aside from photography aren’t you also here to get away from the rush and complexities of daily living?

Slow down and think creatively, you’ll enjoy your trip more and make better images.

It’s easy to backpack into a beautiful area, set up camp, grab your camera and snap your brains out. However, when you get back home you most likely will have only snapshot quality photos.

While on the trail be observant of your surroundings. Take frequent breaks and enjoy the scent of the forest and the sounds of the birds and streams. After setting up camp use this time to relax and restore your physical and mental energy.

Be particularly aware of how the light changes. The position of the sun and the type of light can make the difference between a good and great photo.

See and photograph with your own eyes. Don’t set out armed with GPS coordinates just so you can replicate the other guy’s photo.

Know your subject and photograph deliberately.

Mount Baker Wilderness campsite Backpacking Photography TipsBackcountry Camp Mount Baker Wilderness #53372  Purchase

Selecting A Campsite

Ideally, you’ll need to select a campsite or base camp on longer trips, that is in close proximity* to your subject matter. If your campsite is a mile or more from that perfect mountain view or field of wildflowers you’ll need to rush to get there in time to set up.

This is especially important at sunrise. It’s incredibly easy to just sleep in if you need to make a long pre-dawn trek to that great composition. Especially if it’s several hundred feet higher up. In a perfect situation, you should have a variety of compositions to photograph within a quarter-mile of camp.

If you’re backpacking in a National Park or Wilderness Area with camping restrictions your options may be limited. National Parks deliberately, and for good reasons, limit camping proximity to pristine locations. Always do your research and check in advance. In these situations, you may have to plan on some extra legwork.

*Whenever possible camp only on hardened established sites, bare ground, rock, or snow. This may not be an option in very remote or rarely visited areas. Scroll down to read about minimal impact and Leave No Trace Principles.

Backpacker Baker Lake Trail North CascadesBackpacker North Cascades #65027 Purchase

Location Scouting

Good location scouting begins at home while researching your trip. Trip reports and guidebooks usually include photos of the area. Poring over topographic maps can give clues to directions of light, and hidden features. Goggle searches of your trip area using different keywords can also reveal little-known spots.

1.    If you planned carefully you should arrive at and set up camp early enough to have time to relax and do some scouting. Aside from obviously finding the best spots for compositions, scouting also gives you an opportunity to get to know your subject better.

2.   Walk through the entire area, and look beyond the obvious. While the big snowcapped mountain may be the obvious dominant element, there may be other compositions more subtle yet just as inspiring. It’s easy to focus your attention on the main scene during golden hour and completely miss something even better in the opposite direction.

3.   Be aware of where the sun will rise and set in relation to the landscape. That perfect composition may be in shadow during morning and evening golden hours. This is particularly true in deep narrow valleys.

4.   Be observant of cloud and weather patterns. Some mountain ranges are prone to dramatic midday storms. However, at sunset and sunrise, the sky may be devoid of any clouds. Of course, in some areas, the opposite may be true. That gorgeous summit may be consistently shrouded in clouds at sunset.

5.   Look for key elements which can you can use in compositions. For a mountain scene, a foreground with a winding stream or a grouping of wildflowers can add movement and depth to the image. Objects such as boulders, a distant tent, or a person can also add scale to the scene.

Limestone Lakes Basin Height-of-the-Rockies Provincial Park British ColumbiaLimestone Lakes British Columbia #46236  Purchase

Commit to Photographing

Face it, backpacking and the related chores of camping are a lot of work. But it’s only one-half of the work you’ll face when you’re there to make excellent images. While other parties are sitting around camp enjoying the sunset, or sleeping late the next morning, you need to be on the move.

1.    Don’t be in a rush, plan in extra days. Good light and photography rarely happen on your schedule. An extra day or two in an area increases your chance of getting the light you want.

2.   Get accustomed to rising before dawn in the morning. How early you need to get up depends on how far you are from where you need to photograph. You can always get more sleep when you return to camp.

3.   Stick it out until it’s really over. Some photographers pack it up right after the sun sets or rises. Big mistake. I can’t tell you how many times it appeared like all the best light was gone, only for the sun to find a gap in the clouds and come back in full force. Sometimes you’ll be faced with a boring cloudless sunrise when a few minutes later glowing wisps or puffy clouds develop literally out of nowhere.

4.   Wait for the afterglow. Often, hidden beyond your view, there may be some atmospheric elements that create a beautiful long-lasting afterglow.

5.   If the sky is clear of clouds and there is no afterglow it’s always worth waiting to photograph the Belt of Venus and during the blue hour.

6.   Stay up late or wake up earlier for photographing the Milky Way.

7.   With the right conditions excellent images can be made throughout the day, not just during golden hours. Always keep your mind and eyes open to new creative opportunities.

8.   Wait out the weather. You’ve put a lot of time and energy into getting here. Stick it out if you can.

Glacier Peak backcountry camp North CascadesGlacier Peak Wilderness #58315  Purchase

Eat Well and Smart

Good nutrition is important to maintain the energy you need to sustain a high level of activity. There are endless books, articles, and opinions available to help guide you and confuse you on this topic. Everybody is an expert and will be happy to point out why their research is right and yours is wrong.

I’m not a nutrition expert but I have found out through experience what works for me and what doesn’t. Everybody is different. You’ll need to find a balance of taste, convenience, and nutrition that works for you, preferably in advance of a long trip.

1.    Whatever choice of food make sure you bring enough. You’ll be burning a lot more calories per day than you normally would.

2.   Keep your menu as simple as possible, and look for dehydrated or freeze-dried items to keep the weight down.

3.   For safety in bear country avoid foods with strong odors. Only prepare as much as you can eat, leftovers attract not only bears but also rodents.

4.   Try to bring items that can be prepared by just adding boiling water. The time you save can be spent photographing. You’ll also save weight on fuel.

5.   When on the trail stay well hydrated, and drink an electrolyte replacement instead of plain water. Over the years I’ve tried many, most taste horrible and are ridiculously expensive. I’ve gone back to Gatorade, it tastes better, is cheap, and works for me.

6.   Bring enough energy bars (again, most taste horrible) or trail mix to last the duration of your trip. It’s also a good idea to pack a few special treats to break up the monotony.

7.   Supplements are optional and subjective. I always take a B Complex supplement daily. I find it helps in converting nutrients into energy, but that’s just my opinion.

Backcountry camp Coast Mountains British ColumbiaCoast Mountains British Columbia #61795  Purchase

Leave No Trace

I’ve recently started to add this extremely important topic to all of my hiking posts. Don’t even think about visiting backcountry areas unless you are prepared to strictly follow the guidelines of Leave No Trace (LNT).

All national parks and wilderness areas throughout the world are under incredible pressure from growing amounts of visitors. Please do your part to help preserve these precious areas for future generations!

To learn more about the principles and practicing LNT please take a few minutes to visit the Leave No Trace Center for Outdoor Ethics. Your children and grandchildren will thank you!

Seven Leave No Trace Principles

  • Plan ahead and prepare.                                       
  • Travel and camp on durable surfaces.
  • Dispose of waste properly.                                                                         
  • Leave what you find.                                            
  • Minimize campfire impacts (be careful with fire), better yet don’t build one in the first place, they are completely unnecessary
  • Respect wildlife.  
  • Be considerate of other visitors.

Now that you have some basic understanding of working in the field, get out there and have some fun!

Also, check out these blog posts for hiking and backpacking and photography destinations:
Mount Baker Wilderness Destinations
Hannegan Peak Ruth Mountain Mount Baker Wilderness
Lake Ann Ptarmigan Ridge Mount Baker Wilderness
Coyote Gulch Backpacking Photography

If you found reading Backpacking Photography Tips to be  enjoyable and informative please feel free to share it with friends and family

Ever wonder what it’s like photographing landscapes and nature for a living? Check out my blog post:
What is it like to be a Professional Landscape Photographer?

All photos appearing in Backpacking Photography Tips are available for Commercial Licensing and Fine Art Prints

Want to learn more? Take your Creative Photography to the next level with  Private Instruction and Guided Photo Tours.

Mount Robson British ColumbiaMount Robson British Columbia #54618  Purchase

Backpacking Photography Tips

Backpacker Bugaboo Provincial Park

Backpacking Photography Gear Tips

Backpacking Photography Gear Tips

Backpacker Bugaboo Provincial Park Backpacking Photography Gear TipsBugaboo Provincial Park British Columbia 

For most people bringing back photos from a backpacking trip is essential. Who doesn’t want to share their adventure with friends and family on the social media beast?

The big question is what is the end use for those photos, and what photo gear should you take to meet that end? Ask 100 photographers that question and you’ll get 100 different answers. And there really are no wrong answers here.

For the purpose of this post, I’ll focus on backpacking photography gear tips for photographers that may be in the advanced amateur to aspiring pro levels.

Mount Baker Wilderness campsite North Cascades Washington Backpacking Photography Gear TipsMount Baker Wilderness North Cascades

It’s All About Weight

Get used to it, if you’re into serious photography while backpacking your pack will be heavy, period.

Only you can determine how much weight you can comfortably carry and for how far. There are endless variables that determine what you should or shouldn’t bring, such as photography goals, trip length, elevation gain, trail or off-trail routes, and seasons, to name a few.

Basically though, carrying too much weight can turn your trip into a grueling muscle cramping ordeal. And at the end of the day, you won’t have any energy left for photography. Believe me, I know what I’m talking about here. For 20 years I lugged around a 4×5 film camera with four lenses, 18 film holders, a film-changing tent, extra film, a light meter, a tripod, filters, etc. All this photo gear alone was well over 35 pounds.

So here are my gear tips for helping to make your backpacking photography trip more successful and enjoyable.

Disclaimer: The following tips are offered from my personal experience and preferences after many years of backpacking photography. What works for me may not work for you.

Backcountry camp North Cascades National ParkBackcountry camp North Cascades National Park

Photo Gear

There isn’t much you can do here for weight savings. You can’t shave off pieces of your camera or lens to cut down on weight. And this isn’t the category for scrimping on quality to save weight. My choice of photo gear may be on the heavy side, but it ensures high-quality results.

  • Camera:

    One camera body. The best you can afford. It doesn’t matter if it’s digital or film or, which brand, as long you can change lenses. Make sure it has a high-quality sensor with enough megapixels sufficient for your end-use. A 20-megapixel body may be good enough for social media sharing, but not probably for making large-format fine art prints.

    Pro Tip:   Pro or Prosumer level cameras are much more rugged, and have better weather seals than consumer-level cameras. Something to consider if you regularly visit dusty, and or rainy environments, or are hard on your gear.

My Gear:
Nikon D850 Yes, it’s heavy, but it’s well-built with all the features I need and more. Its 45.7-megapixel sensor is outstanding for night sky photography and mural-size prints.
Really Right Stuff L Plate Used for quick release in conjunction with Really Right Stuff Tripod Ballhead.

Alice Lake camp Sawtooth MountainsIlluminated tent, Sawtooth Mountains Idaho

  • Lenses:

    Wide or ultra-wide to short telephoto lenses will cover most situations. Again, go with the highest quality you can afford. It would be ideal to bring just one zoom lens with a focal length of 20-200mm. However, the quality of such a lens may not be optimum.

    Many photographers will swear by the quality of prime lenses, but for our purpose bringing an armload of them isn’t practical. One wide-angle zoom lens, plus a normal to short telephoto zoom lens would be a good option.

    Pro Tip:  High-quality lenses are always more important than the camera body. The most expensive camera or post-processing editing app can’t make up for an inferior-quality lens.

My Gear: 
Nikon 14-24mm 2.8 This lens is considered by many landscape photographers to be the gold standard of wide-angle zooms. I can attest that it is extremely sharp, and has minimal distortion and chromatic aberration.
Nikon 24-70mm 2.8E ED VR  There are arguably smaller, lighter-weight, and cheaper lenses in this focal length. But for me, this lens has proven its worth many times over. It’s tack sharp, and the VR feature is outstanding for handheld work.
Nikon 70-200mm 2.8E FL ED VR  Again, it’s a heavy and expensive lens, but for me, its high-quality glass and features are worth every ounce.

  • Tripod:

    A tripod is an essential piece of photo gear. Night photography would be impossible without it. So would close-ups of flowers, long exposures of flowing water, and techniques such as focus stacking.

A tripod is also one item where you may be able to get away with choosing a lighter-weight model. This is especially true if your camera body and lens combination is on the lighter side.

Many manufacturers offer tripods with three or four-section legs. I prefer three, simpler, fewer parts that can fail. Also, make sure your tripod is tall enough for your needs. Carbon fiber tripods are your best option, they’re slightly lighter than metal and very durable. They also won’t freeze your hands in cold weather light metal does.

In recent years ball heads have become the standard, and I find them to be a vast improvement over older-style handles and knobs.

Pro Tip:   Do not opt for an inexpensive poorly-made tripod with plastic components! They are not stable and break very easily. I was once in desperate need of a replacement tripod while on location. All I could purchase was a cheap lightweight model. Even with everything locked down as much as possible, it was like using a wet noodle to support my camera!

My Gear:
Gitzo GT 1532 Mountaineer Series 1
Really Right Stuff BH-55 Ballhead with quick release plate.

Backcountry camp North CascadesMount Baker Wilderness North Cascades

  • Filters:

Polarizing Filter. Probably one of the most indispensable filters to bring along. Just be careful not to overdo the effect of darkening a sky. Also, keep in mind their limited effect when using wide-angle lenses.
Graduated Neutral Density Filters. I still find them extremely useful. But If you’re looking to save weight you could leave these at home, and produce their effect in post-processing. They are not always the best option in certain circumstances. However, when possible I will always prefer to use them to make the best exposure in the field, and not rely on post-processing techniques.

My Gear:
B+H Polarizing Filter
Lee Graduated Neutral Density Filters: Four filters; 1 & 2 Stop soft and hard edge.
Lee SW150 Mark II Filter System, necessary to accommodate Nikon 14-24mm lens

  • Miscellaneous Gear

    Extra Batteries. I always take three fully charged batteries, one in the camera and two extras. On a recent 10-day backpack, I still had about half power left on my last spare. Be aware that mirrorless cameras may consume more battery power.
    Extra Memory Cards. 
    Remote Shutter Release. Weighs next to nothing and helps in reducing camera shake.
    Micro Fiber Cleaning Cloth. Essential for cleaning lenses and filters
    Camera Chest Pack. I find this optional item to be extremely useful. Not only does it give me quick access to my camera while on the trail, but it also has room for small items such as trail snacks and maps.
    My Gear:
    Lowepro Toploader Pro 75 AWII

Backpacker Glacier Peak Wilderness Backpacking Photography Gear TipsBackpacker Glacier Peak Wilderness

Backpacking Gear

Here is where you’ll have the most opportunities for saving weight while on the trail. It’s also where you can spend or save lots of money. Once again how light you go depends on your destination, how long you will be out, and what season you’ll be backpacking in.

Going Ultralight is the catchword of the day, and gear manufacturers are cashing in on it big time. Just be aware that ultra-expensive ultralight gear may not be ultra-durable, especially when the weather turns nasty, and after a few seasons of use.

Absolutely nothing is worse than sitting out wind, rain, and or snow for days at a time in a flimsy leaking tent.

Nearly every tent, backpack, or rain jacket on the market today will perform well in adverse conditions, at least for their first season. What gear reviewers won’t tell you is how well they hold up after a few seasons of use!

  • Backpack

    A high-quality good fitting backpack is one of the most essential pieces of gear you’ll need for a successful and enjoyable backpacking trip.

    Pro Tip:   Forget that fancy expensive photo gear backpack. They are designed foremost to protect your camera and lenses while on the trial, everything else is secondary. You’ll quickly find that out when you’re several miles into a steep climb when that backpack has suddenly turned itself into a medieval torture device.

    Go with a pack specifically designed for backpacking. Use soft items in your pack, like clothes to protect your gear. Visit a reputable outdoor gear store and try on different packs. Speak with a knowledgeable salesperson about what you need, a good one will help choose and fit the ideal pack. Keep in mind that to accommodate all your photo gear you may need a larger pack than you initially think.

    Pro Tip:   Do not buy a backpack from an online retailer until you have already physically checked it out and tried it on! Ideally, borrow a friend’s for a short trip first to see if it works for you.

    My Gear: 
    Osprey Zenith 88 Osprey makes high-quality packs for every type of adventurer. This is the most comfortable pack I’ve ever used.  Its suspension system is much more comfortable for carrying heavier loads than its popular Aether 85. Perfect size for trips over three or four days in length. Although it is a bit on the large size for a weekend trip.

North Cascades backcountry campBackcountry camp North Cascades

  • Shelter

    A good shelter is the next most important piece of backpacking gear.

    If you’re traveling light and fast, and are only concerned about making miles in gorgeous summer weather without any flying insects to bother you, then even a thin nylon tarp will do.

    But it’s a different story when you’re out for a week and the weather turns sour, with mosquitoes, flies, and gnats out in biblical proportions. Then you’ll wish for something a bit more substantial to protect you and your camera gear.

Look for a lightweight tent with a silicone-treated rain fly. I also like a tent with a vestibule large enough to protect items you don’t want inside the tent. Like boots and a dirty backpack.

My Gear:
Big Agnes Copper Spur 2. Super lightweight, easy to pitch, with two doors and large vestibules. This tent also comes in a one-person size, but I like a little more elbow room.

  • Sleeping Bag and Pad

    For years I steered clear of down bags, mainly because  I felt they were a poor option in the rainy Pacific Northwest. However, now I’m an enthusiastic supporter of down. They’re like sleeping enveloped in a warm cloud. And they’re generally much lighter and more compressible than synthetic bags. A high-quality down sleeping bag is not cheap so look at it as an investment. However, with proper care, a well-made bag will last for many years. Feathered Friends and Western Mountaineering make some of the finest bags around.

    Sleeping pads are essential for keeping those roots from poking into your back while sleeping, or for insulation when camped on snow. Options here are either a foam pad or an inflatable. I’ve used Therm-a-Rest pads exclusively for many years. They are incredibly comfortable with adjustable firmness, are lightweight, and compress down very well.

    My Gear:
    Western Mountaineering Badger 
    Therm-a-rest Classic

Backcountry Camp North Cascades National Park Backpacking Photography Gear TipsNorth Cascades National Park

  • Stove

    Another essential item for any overnight trip. The days of preparing your meals over an open campfire are long gone. Campfires above timberline are banned just about everywhere, and for many good reasons. Besides, cooking over an open fire takes an long time and is messy and dangerous.

    The two options are liquid white gas (Coleman Fuel) and butane mix canisters. Canister stoves are all the rage right now and some are much better than others.  The biggest drawback with canister stoves is that they lose their power output in colder weather. You’ll need to keep the canisters warm for maximum performance.

    Liquid fuel stoves perform well at any temperature and do so to the last drop of fuel. For this reason, they are the better option for winter trips. They weigh only slightly more than canister stoves, and there are no empty canisters to dispose of. However, canisters can be recycled in some areas if prepared properly. Check with your local recycling facility for regulations.

    My Gear:
    MSR Reactor I recently switched from my trusty MSR XGK stove to the reactor, and so far I have been very pleased. This stove system with fuel canisters is lighter weight, and it boils water very quickly. However, one drawback is that in cold weather it is necessary to keep fuel canisters warm. Ideally, you can accomplish this by keeping them in your sleeping bag at night.

Titcomb Basin backcountry campWind River Range

  • Footwear

    Proper footwear is only second to a good backpack for comfort on the trail. There is a strong debate on leather boots vs lightweight trail runners. For years I’ve sworn by stiff leather boots with lugged soles. But on recent trips, I’ve gone with lighter-weight boots, and will probably move more toward trail runners shortly.

    Pro Tip:  Be aware that if you’re backpacking in the mountains early in the season lightweight shoes may not be the best option. Hiking in snow for only a few minutes will result in very wet cold feet. On steep snow slopes, you also won’t get much traction, and step-kicking will be very difficult.

  • Other Gear

    Here is a list of other necessary items. They’re all important, but I won’t go into detail about them since it would require a separate article.

    Weather appropriate clothing
    Cookware
    Water bottle or hydration bag
    Water filters or other purification methods
    Food, including trail snacks
    Map
    Headlamp
    Ten Essentials

Limestone Lakes Basin Height of the Rockies Provincial Park British ColumbiaHeight of the Rockies Provincial Park

In Conclusion

This should provide you with enough gear tips to begin planning for your next backpacking photography trip. As I mentioned many times in this article, cutting down on weight is important. But so is your comfort level. This isn’t a contest to see who can have the lightest pack and hike the farthest. So what if you choose a slightly beefier tent, or need to bring another lens? It’s your trip and you can always make adjustments to your preferences in the future.

Now get out there and have fun!

Also, check out these blog posts for hiking and backpacking, and photography destinations:
Mount Baker Wilderness Destinations
Hannegan Peak Ruth Mountain Mount Baker Wilderness
Lake Ann Ptarmigan Ridge Mount Baker Wilderness

Thanks for reading, feel free to share this post with your friends and colleagues! And make sure to check out my next post in this series: Backpacking Photography Tips

Backpacker on Titcomb Basin Trail Wind River Range Wyoming Backpacking Photography Gear TipsTitcomb Basin Wind River Range

If you found reading Backpacking Photography Gear Tips to be  enjoyable and informative please feel free to share it with friends and family

Ever wonder what it’s like photographing landscapes and nature for a living? Check out my blog post:
What is it like to be a Professional Landscape Photographer?

All photos appearing in Backpacking Photography Gear Tips are available for Commercial Licensing and Fine Art Prints

Want to learn more? Take your Creative Photography to the next level with  Private Instruction and Guided Photo Tours.

Backpacking Photography Gear Tips

Oxbow Bend Grand Teton National Park

Grand Teton Photography Locations

Grand Teton Photography Locations

Oxbow Bend Grand Teton National ParkOxbow Bend Grand Teton National Park #67724  Purchase

A photography trip to Grand Teton National Park can be a once-in-a-lifetime experience. It can also be one in a series of return trips to photograph the park in-depth, and in all seasons. Whichever it is for you, photographing this gem in the national park system can be a daunting challenge. This is especially true if it is your first visit to Grand Teton.

As I mentioned in my previous post, Grand Teton National Park Trip Planning, a visit to photograph this or any other national park can be a very rewarding experience. It can also be a disappointing exercise in frustration. Good planning and having enough time available to meet your photography goals increase your chances of success.

Since I’ve already outlined trip planning in my previous post, let’s start talking about locations. Grand Teton is a big park with dozens of great areas to photograph in. However, for this post, I’m going to focus only on some of the more popular front-country road accessed locations. But first.

Grand Teton in clearing stormGrand Teton in Clearing Storm #67405  Purchase

Some Essential Tips To Remember

 Essential Tip #1:   Nearly all photography locations in Grand Teton National Park are best photographed in early morning light and sunrise. Of course, this means you’ll need to accustom yourself to rising very early and setting up on location before dawn. However, most of those same locations are also great for evening and sunset photography. But in Grand Teton sunrise has the edge.

Essential Tip #2:   Scout out your desired locations ahead of time. Leisurely walk around and previsualize compositions in advance. That way when you return in the morning or evening you won’t waste precious time and light scrambling around wondering where the best compositions are.

Essential Tip #3:   Throughout this post, I reiterate the value of photographing during the morning and evening golden hours. However certain lighting conditions can make excellent photography possible during every part of the day. Just because the golden hour is over is no reason to stop photographing. Have an open mind and be creative!

Essential Tip #4:   Be ready to encounter hordes of other photographers nearly everywhere you go.  Plan to arrive and set up in your chosen spot an hour and a half to two hours early. Yes, that means for sunrise photography you’ll be there in position while the stars are still out. Dress warmly, you’ll be standing there for a while! And expect to be elbow to elbow and lock tripod legs with other photographers.

Essential Tip #5:   Be respectful of other photographers and park visitors. For many of them, this literally can be a once-in-a-lifetime trip that they scrimped and saved for. Everybody wants to get that perfect photo from the best spot. But don’t be one of those jerks that pushes and shoves their way into the front. If you arrive late that’s your fault, come back the next day, or better yet get creative and find a new composition nearby. And please be friendly. So many photographers can be reluctant to converse as if they’re going to reveal a special photo secret or technique by talking to their neighbor. Grow up, we’re all here for the same reason, have fun you may make some new friends.

Essential Tip #6:   PLEASE, PLEASE PLEASE, be respectful of the environment! All of our parks and wildlands are being loved and photographed to death. If there are signs prohibiting entry or are roped off for restoration, don’t ignore them, no matter how tempting it may be to get that photo. It also should go without saying, don’t alter the scene by cutting down branches that get in your way. If necessary retouch unwanted objects out in Photoshop. Read more about Outdoor Ethics here.

Essential Tip #7:   Wildlife such as bison, moose, and elk are abundant in Grand Teton National Park. All wildlife from bison and elk to squirrels and birds have difficult lives just trying to survive on a daily basis. Please give them a wide berth and strictly observe park regulations. Never ever, under any circumstances, for any reason, approach wildlife. They can easily be stressed and provoked into attacking. While you’re recuperating in the hospital, park officials will be busy destroying that animal. I’m sure that’s not in your trip plan.

Moulton Barn Grand Teton National ParkT.A. Moulton Barn Grand Teton National Park #67410  Purchase

Mormon Row Barns / Antelope Flats

This is is one of the closest locations to the town of Jackson and offers a variety of photographic opportunities. Historic Mormon Row has several noteworthy structures, but the two iconic Moulton Barns are the biggest attractions here. Both barns are close enough that you can photograph both of them during the same golden hour session. However, if you have time available try for one and return the next day for the other. That way you can avoid rushing and finding another parking in the limited parking areas. This area also has some attractive old cottonwood trees to aid in compositions, which are especially nice in fall color.

Antelope Flats Wildflowers Grand Teton National Park Wyoming
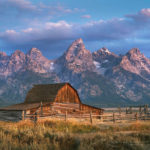
Antelope Flats Wildflowers Grand Teton National Park #52085 

Antelope Flats is a great area to photograph carpets of yellow balsamroot wildflowers in spring. They make a wonderful foreground element to the dramatic snow-covered Teton Range. Some of the best displays are in the vicinity of the Gros Ventre (pronounced “Grow Vaunt”) road. Early June is the best time of the year to photograph balsamroot and lupines in the Teton Valley. Again, you’ll want to thoroughly check out the entire area the day before to find where the best displays are.

Best time of day for photography:  Morning, though excellent in the evening.
Best season for photography: Moron Row spring, summer, fall. Antelope Flats wildflowers, late May-June.

Snake River Overlook Grant Teton National ParkSnake River Overlook #67652  Purchase

Overlooks Along U.S. Highway 191/89

These include Blacktail Ponds Overlook, Glacier View Turnout, Teton Point Turnout, and Snake River Overlook. All, except perhaps Blacktail Ponds Overlook, have excellent wide-open views of the Teton Range. Photography at these locations doesn’t get much easier, as compositions can be made a few steps from the parking lot. As you move from Blacktail Ponds Overlook in the south to Snake River Overlook in the North the view of the Teton Range changes considerably.

Snake River overlook is the most popular since it was here that Ansel Adams made his famous 1942 photo of the Tetons. Be forewarned that over the years trees in the scene have grown considerably. Today, because of this, the Snake River is partially obscured. The view is still wonderful though.

Best time of day for photography:  Morning, though excellent in the evening.
Best season for photography: All Seasons

Schwabacher Landing, Grand Teton National ParkSchwabacher’s Landing Grand Teton National Park #67503  Purchase

Schwabacher’s Landing

This is one of the prime locations in the Grand Teton for photography, and one of the few accessible to the Snake River. Expects to see lots of other photographers here at sunrise.

There are several excellent options here, including the iconic view of the Grand Teton framed by trees reflected in the still waters of beaver ponds. This photo is a short walk north from the parking lot at the end of the road. It’s imperative to arrive very early, as the ideal composition is within a narrow range of only about four feet wide. Be polite, your neighbor will be photographing the same scene only inches away from you.

Schwabacher Landing Grand Teton National ParkSchwabacher’s Landing Grand Teton National Park #67383  Purchase

There is also two creekside (actually branches of the Snake River) areas that provide great photo opportunities. The first is along the trail to the beaver pond viewpoint. The second,  just as interesting but less photographed, is 1/4 mile back down the road. Both of them offer compositions where the Teton Range is reflected in the calm waters. There is also an abundance of cottonwoods trees here, making fall photography an absolute must.

Schwabacher’s Landing is a location that offers so many possibilities that you can easily just photograph just here if you only have a couple of days available in the park.

Essential Tip #8:   Be aware that this entire area is in a fragile wetland environment. Please observe signs of areas closed for restoration. This is also prime moose habitat. Be alert when walking through brush, I once came across a female and her calf here. If you’ve never seen a moose in person you’ll be amazed at how big they are. Don’t get in their way!

Best time of day for photography:  Morning, and evening. Beaver ponds photo, mostly morning.
Best seasons for photography:  FallSpring, Summer. This area is closed and off-limits in winter to protect wildlife habitat.

Full Moon Grand Teton National ParkTeton Range from Cunningham Ranch #67608  Purchase

Cunningham Ranch

This is one of my favorite areas in the park for photography. It has excellent photographic potential but many photographers pass it over for Schwabacher’s Landing or Oxbow Bend. The views of the Teton Range here are outstanding. The western pole fencing makes a great composition element. It’s also possible to access views along the Snake River, via a long walk through pastures. Occasionally you’ll see herds of elk, or horses from the nearby Triangle X Ranch grazing here, another great aid for compositions.

Horses Grazing at Cunningham Ranch Grand Teton National ParkThe Teton Range from Cunningham Ranch #49377  Purchase

Nearby on the East side of Highway 191/89 is the North access to the Shadow Mountain Dispersed Camping Area of the Bridger-Teton National Forest. A wide parking lot just outside the park boundary is the only place in the entire valley available for winter camping.

Best time of day for photography:  Morning, and evening.
Best season for photography:  All year

Oxbow Bend sunrise Grand Teton National ParkOxbow Bend Sunrise Grand Teton National Park #67699  Purchase

Oxbow Bend

This is arguably the granddaddy of all photo locations in Grand Teton National Park. The views of Mount Moran and the Teton Range reflected in the still waters of the Snake River are recognizable throughout the world. In addition, this is a prime wildlife viewing area. You can often see Trumpeter Swans floating lazily on the water, along with moose grazing in the willows across the river. I once saw an enormous herd of elk fording the river here, a scene reminiscent of Serengeti migrations.

Oxbow Bend sunset Grand Teton National ParkOxbow Bend Sunset #67566  Purchase

You can also observe mobs of photographers, every morning and evening, every day. Don’t even think of finding a prime spot unless you get here well over an hour in advance of golden hour. Most photographers try for a spot at the parking lot edge, however, there are plenty of excellent options among the willows along the river.

Aside from the view from the river, there are also a couple of other spots well worth checking out. This is one of the best areas in the park for fall photography, mainly due to the abundance of aspens groves and willows. About a quarter-mile east of the Oxbow Bend parking lot is another pullout at the edge of large groves of aspens. During the height of fall color, these trees make spectacular frames for the Teton Range.

Grand Teton National Park WyomingTeton Range above Oxbow Bend #52069  Purchase

Also, on the benchland above Oxbow Bend, there are great views looking down to the aspens surrounding the area, and out to the Teton Range. This view is accessed from the trails on the Christian Pond Loop. If you have the time it’s well worth returning to photograph these two areas after photographing the main attraction. And of course, they’re another option if the riverside crowds are a bit too much for you.

Best time of day for photography:  Morning, and evening.
Best season for photography:  Hands down, fall is best, but excellent throughout the year. Also one of the best locations in the park for winter photography.

Wildflowers Grand Teton National Park WyomingWildflowers Grand Teton National Park #52034  Purchase

Pilgrim Creek Road

Between Jackson Lake Junction and Colter Bay Village is Pilgrim Creek Road. This approximately three-mile-long gravel road gives access to the Teton Wilderness in the Bridger-Teton National Forest. For photographers, the first mile or so of this road gives access to some of the best spring wildflowers in the North end of the park.

Unlike wildflowers around Antelope Flats, this area can be a bit more tricky to photograph. The peak bloom usually happens around early June, but a good show depends on a wet season. During a drier than normal spring, there may not be a large enough bloom to make the trip worthwhile. Also, some of the best groupings may not be obvious from the road, so make sure to park your vehicle and thoroughly scout the area on foot.

Best time of day for photography:  Morning, and evening.
Best season for photography:  Spring

Grand Teton National Park in winterWinter along Teton Park Road #3725  Purchase

Teton Park Road

This long stretch of road encompasses everything from Moose Entrance in the South to the Jackson Lake Junction in the North. Beginning in the North the Potholes and Mount Moran Turnouts offer closer photos of the Teton Range, and in particular the Cathedral Group. In June this is also a very good area for yellow balsamroot wildflowers.

The main highlights of this area are the trails along Leigh, String, and Jenny Lakes. You can park at the Leigh and String Lakes Trailhead and do the entire loop hike. Or you can park at the Jenny Lake Overlook and walk only a portion of the trail. Either way, this is the best place to get up close and personal photos of the Cathedral Group and Cascade Canyon.

Further south the Taggart Lake trail will take you to stunningly close views of the Grand Teton.

Essential Tip #9:   Leigh, String, and Jenny Lakes are best photographed at sunrise and early morning. The lake waters are more apt to be still and mirror-like at this time. Also, the proximity here to the walls of the Teton Range will put most of the areas along Teton Park Road in shade during the second part of the day.

Best time of day for photography:  Morning
Best seasons for photography:  Spring, Summer, Fall. Teton Park Road is closed in winter at Taggart Lake Trailhead in the South and Signal Mountain Lodge in the North. However, in winter this road is open to cross country skiing and snowshoeing.

Grand Teton National ParkThe Teton Range from Jackson Lake #67525  Purchase

Other Grand Teton Photography Locations

As mentioned earlier, this post covers only the more popular easily accessible locations for photography in Grand Teton National Park. There are many more opportunities to explore including these:

  • Laurence S. Rockefeller Preserve
  • Viewpoints along the North section of Jackson Lake
  • Extensive trail system along Jackson Lake starting from Colter Bay Village
  • In the backcountry, a network of trails gives access to the backside of the Teton Range and includes numerous lakes, canyons, and subalpine meadows. All overnight backcountry trips require permits.

Camera Equipment Suggestions

What camera gear should you bring on a Grand Teton photography trip? In a nutshell, everything you have. Ok, maybe not everything, especially if you’re a gear junkie with dozens of lenses and camera bodies. But the subject matter in the park is so diverse you’ll probably end up using everything from ultra-wide to telephoto lenses.

Basic Essentials:

  • Tripod
  • Wide to ultra-wide lenses
  • Normal range lens
  • Telephoto lens; for landscapes up to 200mm should be fine, but much longer focal lengths if you also plan to photograph wildlife.
  • Polarizing filter
  • Graduated Neutral Density Filters;  I still prefer to use these in the field over creating the effect in post-processing. Although in some situations they are not always the best option.
  • Remote shutter release

In Conclusion

Combining all the information and tips in this post and Grand Teton Photography Trip Planning, you now should have everything you need to know to have a productive, safe, and enjoyable trip to Grand Teton National Park. Now get out there and have fun!

Essential Tip #10:   BE CREATIVE! Use your own eyes and mind. Just because 20 other photographers are photographing the exact same scene, in the exact same position, with the exact same gear and settings, doesn’t mean that you have to follow suit. Photographing something uniquely and creatively could be as simple as just turning around to see what’s behind you!

Thanks for reading, feel free to share this post with your friends and colleagues!

Oxbow Bend sunrise Grand Teton National ParkOxbow Bend Sunrise Grand Teton National Park #67681  Purchase

Ever wonder what it’s like photographing landscapes and nature for a living? Check out my blog post:
What is it like to be a Professional Landscape Photographer?

All photos appearing in Grand Teton Photography Locations are available for Commercial Licensing and Fine Art Prints. Click on any image to purchase, or contact me for more info!

Want to learn more? Take your Creative Photography to the next level with  Private Instruction and Guided Photo Tours.

Related Blog Posts to Grand Teton Photography Locations:
Grand Teton Photography Trip Planning

Moulton Barn Grand Teton National Park

Grand Teton Photography Trip Planning

Grand Teton Photography Trip Planning

Moulton Barn Grand Teton National Park Grand Teton Photography Trip PlanningMoulton Barn Grand Teton National Park  #67219  Purchase

This post is the first in an ongoing series of articles intended to help landscape and nature photographers plan photography trips to big locations on a small budget.

Photography in Grand Teton, or any National Park, can be a very rewarding experience. It can also be a disappointing exercise in frustration. Even the most meticulous planning is not a guarantee of success. It all depends on what your goals are, and how much time you have available.

In this post, I’ll be offering some planning tips and suggestions which can help increase your chances of success during a Grand Teton photography trip. Whether the results are better vacation photos or portfolio-quality images, they’ll also help you obtain a more enjoyable and memorable experience.

Planning A Grand Teton Photography Trip

Theoretically, you can spend as little as a day in the park and come away with a few good photos. In reality that probably won’t happen. So I would recommend at least three days to concentrate on one, or maybe two locations. A better time frame would be a week. For a comprehensive trip to include all of the park’s highlights, at least two to three weeks would be ideal.

Make sure you have as much time available to meet your goals. And make those goals realistic, don’t expect to create portfolio-grade images every morning and evening during your stay. It’s incredibly unlikely that you will have excellent light to work with during every golden hour photo session. On my last trip, I spent two weeks in the park and had only one evening and two mornings of decent light.

Of course, it’s also a silly notion to think that planning on just one trip to Grand Teton you’ll come away with award-winning images from every corner of the park. Just like you can’t go to the grocery store and expect to buy all the food you’ll ever need if your lifetime. You’ll need to return again and again.

Learn to go with the flow, relax, get to know, and interact with your subject matter. If you only come away with one or two good photos that’s great, you can always return another time. Good photography is about much more than grabbing trophy images, it’s a lifetime learning journey that should be savored, not rushed.

Guided Tour Or Solo

Once you determine how much time you’ll have available the next thing you’ll need to decide is whether to go with an established workshop/photo tour or do the trip on your own. There are many advantages and disadvantages to either option.

Photo Tour/Workshop Advantages:
-Led by a seasoned professional photographer with intimate knowledge of the park and the opportunity of learning new techniques from a pro.
-Meals, lodging, and transportation usually included
-Being part of a group dynamic

Photo Tour/Workshop Disadvantages:
-Limited freedom to photograph where and when you want
-Daily schedules can be very rigid
-Travel times and distances from lodging to locations can be great
-Cost can be prohibitive

Solo Photo Tour Advantages:
-Unlimited freedom, photograph where you want when you want
-Ability to lodge or camp where you choose, cutting down on travel time to         locations
-Huge cost savings

Solo Photo Tour Disadvantages:
-Extra research needed to find the best locations
-Finding lodging on the fly daily can be difficult
-Lack of assistance from a leader or group members
-No one to share ideas or experiences with

During my entire career as a professional photographer, I’ve traveled mostly solo. I love the freedom and flexibility associated with this mode of travel. And I know for certain that I’ve been able to get better photos because of it. So this is the mode I’ll be giving tips on in this post.

Grand Teton Photography Trip Planning: Seasons

Many photographers consider autumn to be the best. However,  Grand Teton National Park offers spectacular photographic opportunities in all four seasons.

Grand Teton National Park in winter Grand Teton Photography Trip PlanningThe Teton Range in Winter #4660  Purchase

Winter:  Planning a winter photography trip to Grand Teton requires more preparation and gear. In winter Teton Park Road is closed to vehicles, as is the popular Schwabacher’s Landing. Antelope Flats and Mormon Row Roads are also inaccessible. However, all the viewpoints along Highway 191/89 from Jackson to the Flagg Ranch in the north are open, including the famous Oxbow Bend overlooks. Snowshoes and cross-country skis are an excellent option to access some of the easier areas of the park.

Most of the lodging and services in the park are also closed for the season. Lodging options are mostly in the Jackson area in winter, and camping is nearly nonexistent with just a few spots open in the Shadow Mountain area. With temperatures that can dip down to -30º you won’t have much company. But with the right weather and lighting, you’ll come back with some rare winter images of the park.

Spring:  Since the Teton Valley sits at an altitude of just over 6000′ winter conditions can last well into spring. May would be about the earliest I would consider visiting for spring photography. Late May through June is the best time to visit to see wildflowers. During this time many areas of the valley are blanked with brilliant yellow balsamroot and blue lupines, to name a few.

Antelope Flats and Gros Ventre (pronounced “Grow Vaunt”) roads, along with Pilgrim Creek Road near Colter Bay are among the best areas for spring wildflowers. Most of these areas are also wide open for including the snowy Teton Range as a dramatic backdrop for compositions.

Wildflowers Grand Teton National Park Wyoming Grand Teton Photography Trip PlanningWildflowers Grand Teton National Park #52086  Purchase

Summer: This is the high season for tourism in the park, and possibly one of the most challenging for photographers. This is not only because of having to deal with crowds but also because of weather conditions.

During the height of summer, high-pressure ridges can create beautiful warm sunny weather, which unfortunately keeps the sky free of clouds. Most photographers consider blank blue skies and gray rainy days as some of the worst conditions to work with. With global warming in full swing, these conditions can last well into September.

Along with those warm sunny days comes the yearly threat of wildfires. In recent years the park’s blue skies are often hazy with thick blankets of smoke. Another consideration of summer photography is that as the season progresses the Teton Range gradually loses its white cloak of snow. I don’t think I’m alone in feeling that snowy mountains look more attractive than bare rock.

Fall:  This is arguably the most popular season for photographers in Grand Teton National Park. Although the crowds of tourists and vacationers are mostly absent, there are now throngs of photographers to take their place. And for good reason. In a good year, the changing colors of aspens, cottonwoods, and willows can be as outstanding as autumn in New England.

In addition to the lively colors of foliage, the changing seasons bring back storms that not only clear the air but also dust the range with a fresh coat of snow. Quite possibly some of the most sought-after national park images in the country are those of the Teton Range in full autumn color after a snow storm.

Grand Teton National Park Wyoming Grand Teton Photography Trip PlanningSunset over the Teton Range #3966  Purchase

Grand Teton Photography Trip Planning: Lodging

Location, location, location. It’s all about location. And Grand Teton is no exception, it’s a big park with many great locations spread throughout it. Generally, you’ll have time to photograph only one location during the morning or evening golden hour. By the time you can reach the next spot the light will most likely have faded. And remember this isn’t a race or contest, slow down and appreciate where you are!

The closer you stay to your subject matter the better chance you have of being in right place at the right time. And you will be more relaxed and focused when you get there.

Absolutely nothing is worse than planning on being at a certain spot before sunrise than being late because of hitting the snooze alarm one last time and then having a long drive ahead. Stopped for speeding, or worse, hitting a moose in the dark during your haste? Ughh!

No matter where you stay, be it in a national park or forest service campground, or a motel or resort, be prepared to make reservations well in advance of your trip, if possible. Even in the shoulder seasons vacancies in lodging and campgrounds can be difficult to find. Popular campgrounds will fill by early morning. Research and plan ahead. It’s no fun driving around in the dark after a long day trying to find a place to sleep.

In the Town of Jackson:  If you crave luxury and have deep pockets then look no further than the town of Jackson. Some of the most opulent hotels and resorts in the West are in this town, as are many chain and mom and pop motels. However, be aware that all of them will have a considerably higher price due to their location.

Also, keep in mind that distances from the town of Jackson to many of the most scenic park locations can be anywhere from 15-35 miles. Not a terribly long drive, but back and forth to a motel over several days can really add up. And don’t forget that ideally, you’ll need to be at your desired location before sunrise and until after sunset. So you won’t be sleeping in that expensive bed for very long.

Shadow Mountain Dispersed Camping Area  Bridger Teton National ForestShadow Mountain Dispersed Camping Area #67195  Purchase

In Grand Teton National Park:  There are seven lodging options within the park boundaries. These range from rustic cabins and ranches all the way up to the full-service luxury hotel of the Jackson Lake Lodge. Depending on where in the park you want to orient your photography efforts, these facilities can put you just a few minutes from some of the most dramatic vistas in the park.

There are five official front country campgrounds in the park with varying amenities. At the time of this writing, none of them are available for advance reservations. Most of them will fill to capacity before 10:00 a.m. Jenny Lake is one of the best and most sought-after campgrounds. If you choose Jenny Lake campground be prepared to line up for a site well before sunrise, it routinely fills by 6:00 a.m.!

Bridger-Teton National Forest: There are several national forest campgrounds outside the eastern boundaries of the park. These include a couple on Gros Ventre Road and U.S. Highway 26-287.

In my opinion, the most ideal national forest campsites are in the Shadow Mountain camping areas of Bridger-Teton National Forest. This area is in an ideal location just outside of the eastern middle edge of the park. These sites are always my first choice when visiting the park. I know of at least one site here which has an incredible elevated view of the entire Teton Range and valley.

Camping in the Shadow Mountain area is free on a first-come-first-served basis. Stays are limited to five consecutive nights. However, it is primitive camping with only vault toilets and no running water. In addition, parts of the roads can be very difficult to negotiate, high clearance is advised and some can be impassable to trailers. As with everywhere else in the park vicinity, these sites fill up early.

Grand Teton National Park WyomingHighway 191 Grand Teton National Park #49386  Purchase

Fees, Passes, Provisions, Cell Signals

The entrance fee to Grand Teton National Park is currently $35 for a private vehicle and is good for seven days. An annual pass exclusive to Grand Teton National Park is $70. Note that both of these passes are good only for Grand Teton, they do not carry over to neighboring Yellowstone National Park.

Consider an America The Beautiful annual pass if you photograph in many national parks and federal recreations areas throughout the year. This pass costs $80 and is good for National Parks, BLM lands, National Forests, and more.

Various amenities like gas, groceries, showers and laundry services are available in several areas of the park. However, if you are on a budget plan to make a trip to Jackson to stock up on supplies. Park concessioners charge a premium for their goods. Although sometimes the cost of driving back to Jackson is more than an inflated price for goods in the park.

Grand Teton is one of the few national parks where you can get a decent cell signal in most areas. In the vicinity of visitor’s centers and lodges, you should be able to receive a signal strong enough to surf the web and transfer small files. Further out it will probably be only one or two bars strong.

In the next post, Grand Teton Photography Locations we’ll go into detail about how and when to photograph specific locations in the park.

Thanks for reading, feel free to share this post with your friends and colleagues!

Oxbow Bend sunrise Grand Teton National ParkOxbow Bend Sunrise Grand Teton National Park #67686  Purchase

Ever wonder what it’s like photographing landscapes and nature for a living? Check out my blog post:
What is it like to be a Professional Landscape Photographer?

All photos appearing in Grand Teton Photography Trip Planning are available for Commercial Licensing and Fine Art Prints. Click on any image to purchase, or contact me for more info!

Want to learn more? Take your Creative Photography to the next level with  Private Instruction and Guided Photo Tours.

Planning a Grand Teton Photography Trip