Grand Teton Photography Locations
 Oxbow Bend Grand Teton National Park #67724 Purchase
A photography trip to Grand Teton National Park can be a once-in-a-lifetime experience. It can also be one in a series of return trips to photograph the park in-depth, and in all seasons. Whichever it is for you, photographing this gem in the national park system can be a daunting challenge. This is especially true if it is your first visit to Grand Teton.
As I mentioned in my previous post, Grand Teton National Park Trip Planning, a visit to photograph this or any other national park can be a very rewarding experience. It can also be a disappointing exercise in frustration. Good planning and having enough time available to meet your photography goals increase your chances of success.
Since I’ve already outlined trip planning in my previous post, let’s start talking about locations. Grand Teton is a big park with dozens of great areas to photograph in. However, for this post, I’m going to focus only on some of the more popular front-country road accessed locations. But first.
Grand Teton in Clearing Storm #67405 Purchase
Some Essential Tips To Remember
Essential Tip #1: Nearly all photography locations in Grand Teton National Park are best photographed in early morning light and sunrise. Of course, this means you’ll need to accustom yourself to rising very early and setting up on location before dawn. However, most of those same locations are also great for evening and sunset photography. But in Grand Teton sunrise has the edge.
Essential Tip #2: Scout out your desired locations ahead of time. Leisurely walk around and previsualize compositions in advance. That way when you return in the morning or evening you won’t waste precious time and light scrambling around wondering where the best compositions are.
Essential Tip #3: Throughout this post, I reiterate the value of photographing during the morning and evening golden hours. However certain lighting conditions can make excellent photography possible during every part of the day. Just because the golden hour is over is no reason to stop photographing. Have an open mind and be creative!
Essential Tip #4: Be ready to encounter hordes of other photographers nearly everywhere you go. Plan to arrive and set up in your chosen spot an hour and a half to two hours early. Yes, that means for sunrise photography you’ll be there in position while the stars are still out. Dress warmly, you’ll be standing there for a while! And expect to be elbow to elbow and lock tripod legs with other photographers.
Essential Tip #5: Be respectful of other photographers and park visitors. For many of them, this literally can be a once-in-a-lifetime trip that they scrimped and saved for. Everybody wants to get that perfect photo from the best spot. But don’t be one of those jerks that pushes and shoves their way into the front. If you arrive late that’s your fault, come back the next day, or better yet get creative and find a new composition nearby. And please be friendly. So many photographers can be reluctant to converse as if they’re going to reveal a special photo secret or technique by talking to their neighbor. Grow up, we’re all here for the same reason, have fun you may make some new friends.
Essential Tip #6: PLEASE, PLEASE PLEASE, be respectful of the environment! All of our parks and wildlands are being loved and photographed to death. If there are signs prohibiting entry or are roped off for restoration, don’t ignore them, no matter how tempting it may be to get that photo. It also should go without saying, don’t alter the scene by cutting down branches that get in your way. If necessary retouch unwanted objects out in Photoshop. Read more about Outdoor Ethics here.
Essential Tip #7: Wildlife such as bison, moose, and elk are abundant in Grand Teton National Park. All wildlife from bison and elk to squirrels and birds have difficult lives just trying to survive on a daily basis. Please give them a wide berth and strictly observe park regulations. Never ever, under any circumstances, for any reason, approach wildlife. They can easily be stressed and provoked into attacking. While you’re recuperating in the hospital, park officials will be busy destroying that animal. I’m sure that’s not in your trip plan.
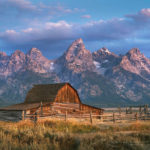
T.A. Moulton Barn Grand Teton National Park #67410 Purchase
Mormon Row Barns / Antelope Flats
This is is one of the closest locations to the town of Jackson and offers a variety of photographic opportunities. Historic Mormon Row has several noteworthy structures, but the two iconic Moulton Barns are the biggest attractions here. Both barns are close enough that you can photograph both of them during the same golden hour session. However, if you have time available try for one and return the next day for the other. That way you can avoid rushing and finding another parking in the limited parking areas. This area also has some attractive old cottonwood trees to aid in compositions, which are especially nice in fall color.
 Antelope Flats Wildflowers Grand Teton National Park #52085
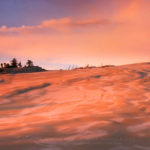
Antelope Flats is a great area to photograph carpets of yellow balsamroot wildflowers in spring. They make a wonderful foreground element to the dramatic snow-covered Teton Range. Some of the best displays are in the vicinity of the Gros Ventre (pronounced “Grow Vaunt”) road. Early June is the best time of the year to photograph balsamroot and lupines in the Teton Valley. Again, you’ll want to thoroughly check out the entire area the day before to find where the best displays are.
Best time of day for photography: Morning, though excellent in the evening.
Best season for photography: Moron Row spring, summer, fall. Antelope Flats wildflowers, late May-June.
Snake River Overlook #67652 Purchase
Overlooks Along U.S. Highway 191/89
These include Blacktail Ponds Overlook, Glacier View Turnout, Teton Point Turnout, and Snake River Overlook. All, except perhaps Blacktail Ponds Overlook, have excellent wide-open views of the Teton Range. Photography at these locations doesn’t get much easier, as compositions can be made a few steps from the parking lot. As you move from Blacktail Ponds Overlook in the south to Snake River Overlook in the North the view of the Teton Range changes considerably.
Snake River overlook is the most popular since it was here that Ansel Adams made his famous 1942 photo of the Tetons. Be forewarned that over the years trees in the scene have grown considerably. Today, because of this, the Snake River is partially obscured. The view is still wonderful though.
Best time of day for photography: Morning, though excellent in the evening.
Best season for photography: All Seasons
 Schwabacher’s Landing Grand Teton National Park #67503 Purchase
Schwabacher’s Landing
This is one of the prime locations in the Grand Teton for photography, and one of the few accessible to the Snake River. Expects to see lots of other photographers here at sunrise.
There are several excellent options here, including the iconic view of the Grand Teton framed by trees reflected in the still waters of beaver ponds. This photo is a short walk north from the parking lot at the end of the road. It’s imperative to arrive very early, as the ideal composition is within a narrow range of only about four feet wide. Be polite, your neighbor will be photographing the same scene only inches away from you.
 Schwabacher’s Landing Grand Teton National Park #67383 Purchase
There is also two creekside (actually branches of the Snake River) areas that provide great photo opportunities. The first is along the trail to the beaver pond viewpoint. The second, just as interesting but less photographed, is 1/4 mile back down the road. Both of them offer compositions where the Teton Range is reflected in the calm waters. There is also an abundance of cottonwoods trees here, making fall photography an absolute must.
Schwabacher’s Landing is a location that offers so many possibilities that you can easily just photograph just here if you only have a couple of days available in the park.
Essential Tip #8: Be aware that this entire area is in a fragile wetland environment. Please observe signs of areas closed for restoration. This is also prime moose habitat. Be alert when walking through brush, I once came across a female and her calf here. If you’ve never seen a moose in person you’ll be amazed at how big they are. Don’t get in their way!
Best time of day for photography: Morning, and evening. Beaver ponds photo, mostly morning.
Best seasons for photography: Fall, Spring, Summer. This area is closed and off-limits in winter to protect wildlife habitat.
Teton Range from Cunningham Ranch #67608 Purchase
Cunningham Ranch
This is one of my favorite areas in the park for photography. It has excellent photographic potential but many photographers pass it over for Schwabacher’s Landing or Oxbow Bend. The views of the Teton Range here are outstanding. The western pole fencing makes a great composition element. It’s also possible to access views along the Snake River, via a long walk through pastures. Occasionally you’ll see herds of elk, or horses from the nearby Triangle X Ranch grazing here, another great aid for compositions.
 The Teton Range from Cunningham Ranch #49377 Purchase
Nearby on the East side of Highway 191/89 is the North access to the Shadow Mountain Dispersed Camping Area of the Bridger-Teton National Forest. A wide parking lot just outside the park boundary is the only place in the entire valley available for winter camping.
Best time of day for photography: Morning, and evening.
Best season for photography: All year
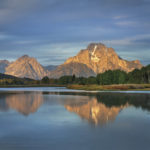
Oxbow Bend Sunrise Grand Teton National Park #67699 Purchase
Oxbow Bend
This is arguably the granddaddy of all photo locations in Grand Teton National Park. The views of Mount Moran and the Teton Range reflected in the still waters of the Snake River are recognizable throughout the world. In addition, this is a prime wildlife viewing area. You can often see Trumpeter Swans floating lazily on the water, along with moose grazing in the willows across the river. I once saw an enormous herd of elk fording the river here, a scene reminiscent of Serengeti migrations.
 Oxbow Bend Sunset #67566 Purchase
You can also observe mobs of photographers, every morning and evening, every day. Don’t even think of finding a prime spot unless you get here well over an hour in advance of golden hour. Most photographers try for a spot at the parking lot edge, however, there are plenty of excellent options among the willows along the river.
Aside from the view from the river, there are also a couple of other spots well worth checking out. This is one of the best areas in the park for fall photography, mainly due to the abundance of aspens groves and willows. About a quarter-mile east of the Oxbow Bend parking lot is another pullout at the edge of large groves of aspens. During the height of fall color, these trees make spectacular frames for the Teton Range.
Teton Range above Oxbow Bend #52069 Purchase
Also, on the benchland above Oxbow Bend, there are great views looking down to the aspens surrounding the area, and out to the Teton Range. This view is accessed from the trails on the Christian Pond Loop. If you have the time it’s well worth returning to photograph these two areas after photographing the main attraction. And of course, they’re another option if the riverside crowds are a bit too much for you.
Best time of day for photography: Morning, and evening.
Best season for photography: Hands down, fall is best, but excellent throughout the year. Also one of the best locations in the park for winter photography.
Wildflowers Grand Teton National Park #52034 Purchase
Pilgrim Creek Road
Between Jackson Lake Junction and Colter Bay Village is Pilgrim Creek Road. This approximately three-mile-long gravel road gives access to the Teton Wilderness in the Bridger-Teton National Forest. For photographers, the first mile or so of this road gives access to some of the best spring wildflowers in the North end of the park.
Unlike wildflowers around Antelope Flats, this area can be a bit more tricky to photograph. The peak bloom usually happens around early June, but a good show depends on a wet season. During a drier than normal spring, there may not be a large enough bloom to make the trip worthwhile. Also, some of the best groupings may not be obvious from the road, so make sure to park your vehicle and thoroughly scout the area on foot.
Best time of day for photography: Morning, and evening.
Best season for photography: Spring
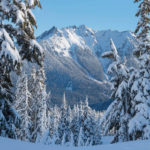
Winter along Teton Park Road #3725 Purchase
Teton Park Road
This long stretch of road encompasses everything from Moose Entrance in the South to the Jackson Lake Junction in the North. Beginning in the North the Potholes and Mount Moran Turnouts offer closer photos of the Teton Range, and in particular the Cathedral Group. In June this is also a very good area for yellow balsamroot wildflowers.
The main highlights of this area are the trails along Leigh, String, and Jenny Lakes. You can park at the Leigh and String Lakes Trailhead and do the entire loop hike. Or you can park at the Jenny Lake Overlook and walk only a portion of the trail. Either way, this is the best place to get up close and personal photos of the Cathedral Group and Cascade Canyon.
Further south the Taggart Lake trail will take you to stunningly close views of the Grand Teton.
Essential Tip #9: Leigh, String, and Jenny Lakes are best photographed at sunrise and early morning. The lake waters are more apt to be still and mirror-like at this time. Also, the proximity here to the walls of the Teton Range will put most of the areas along Teton Park Road in shade during the second part of the day.
Best time of day for photography: Morning
Best seasons for photography: Spring, Summer, Fall. Teton Park Road is closed in winter at Taggart Lake Trailhead in the South and Signal Mountain Lodge in the North. However, in winter this road is open to cross country skiing and snowshoeing.
The Teton Range from Jackson Lake #67525 Purchase
Other Grand Teton Photography Locations
As mentioned earlier, this post covers only the more popular easily accessible locations for photography in Grand Teton National Park. There are many more opportunities to explore including these:
- Laurence S. Rockefeller Preserve
- Viewpoints along the North section of Jackson Lake
- Extensive trail system along Jackson Lake starting from Colter Bay Village
- In the backcountry, a network of trails gives access to the backside of the Teton Range and includes numerous lakes, canyons, and subalpine meadows. All overnight backcountry trips require permits.
Camera Equipment Suggestions
What camera gear should you bring on a Grand Teton photography trip? In a nutshell, everything you have. Ok, maybe not everything, especially if you’re a gear junkie with dozens of lenses and camera bodies. But the subject matter in the park is so diverse you’ll probably end up using everything from ultra-wide to telephoto lenses.
Basic Essentials:
- Tripod
- Wide to ultra-wide lenses
- Normal range lens
- Telephoto lens; for landscapes up to 200mm should be fine, but much longer focal lengths if you also plan to photograph wildlife.
- Polarizing filter
- Graduated Neutral Density Filters; I still prefer to use these in the field over creating the effect in post-processing. Although in some situations they are not always the best option.
- Remote shutter release
In Conclusion
Combining all the information and tips in this post and Grand Teton Photography Trip Planning, you now should have everything you need to know to have a productive, safe, and enjoyable trip to Grand Teton National Park. Now get out there and have fun!
Essential Tip #10: BE CREATIVE! Use your own eyes and mind. Just because 20 other photographers are photographing the exact same scene, in the exact same position, with the exact same gear and settings, doesn’t mean that you have to follow suit. Photographing something uniquely and creatively could be as simple as just turning around to see what’s behind you!
Thanks for reading, feel free to share this post with your friends and colleagues!
Oxbow Bend Sunrise Grand Teton National Park #67681 Purchase
Ever wonder what it’s like photographing landscapes and nature for a living? Check out my blog post:
What is it like to be a Professional Landscape Photographer?
All photos appearing in Grand Teton Photography Locations are available for Commercial Licensing and Fine Art Prints. Click on any image to purchase, or contact me for more info!
Want to learn more? Take your Creative Photography to the next level with Private Instruction and Guided Photo Tours.
Related Blog Posts to Grand Teton Photography Locations:
Grand Teton Photography Trip Planning
 Virgin River Zion National Park #09187 Purchase
 Buckhorn Wash Pictographs, San Rafael Swell Utah #42086 Purchase
 Capitol Reef National Park #2901 Purchase
 at dawn on rim Green River Overlook, Canyonlands National Park Utah") Canyonlands National Park #27457 Purchase
Canyonlands National Park #27457 Purchase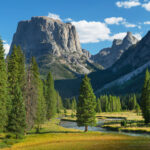


 Antelope Flats Wildflowers Grand Teton National Park #52085